Centralized hot water supply is a great boon that makes life and housekeeping convenient and comfortable. In country houses and during summer blackouts, hot water comes to the rescue instantaneous water heaters. They are divided into pressure and non-pressure. If you have the skills to work with plumbing and electrical, a home master can install them yourself.
Installing a instantaneous water heater: step-by-step instruction
Installation of a flow heater is carried out in accordance with the recommendations set out in the user manual. In addition, the safety requirements for electrical and plumbing work must be observed.
Installation work is divided into the following steps.
Preparatory work - mains check
Flowing heaters heat water at the time of its passage. Therefore, they consume more power - from 2 to 30 kilowatts. Before purchasing a specific model, you need to find out whether the power supply can withstand such power at the installation site.
In addition, you should make sure that the wiring is made of modern materials and has a sufficient cross section. In any case, it is better to draw a separate line from the distribution panel, feeding it through the charge disconnect device (RCD). To connect the device to a standard 220-volt alternating current network, a three-core copper wire with double insulation (type NYM or VVG) with a cross section of at least 2.5 mm2 and an RCD designed for a current of 30 A is used. It is imperative to use grounding. If wiring is done on a wall undergoing heating, the wire cross section should be increased.
Choosing a place to install
The mounting location of the device is determined by its type. Non-pressure type devices are installed near the place of consumption of hot water in order to reduce heat loss. Such heaters are mounted to the side or top of the sink, next to the mixer in the bathroom. If the appliance is equipped with both a drain device and a shower hose, a place must be provided for attaching the watering can.
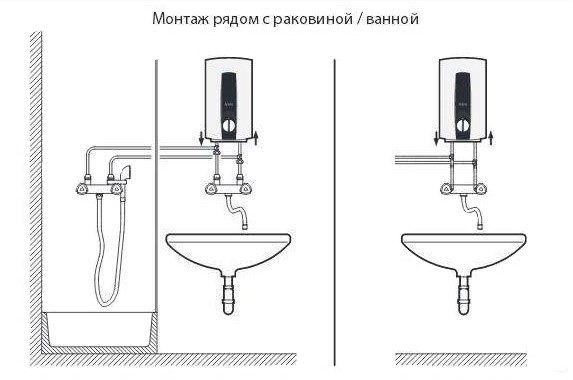
Installation near shower and sink
Different models are available with varying degrees of moisture protection. In any case, they should be installed so that the stream of water from the shower does not enter the body. At the same time, the controls (pressure, temperature and power button) should be easily accessible when using the sink and shower.
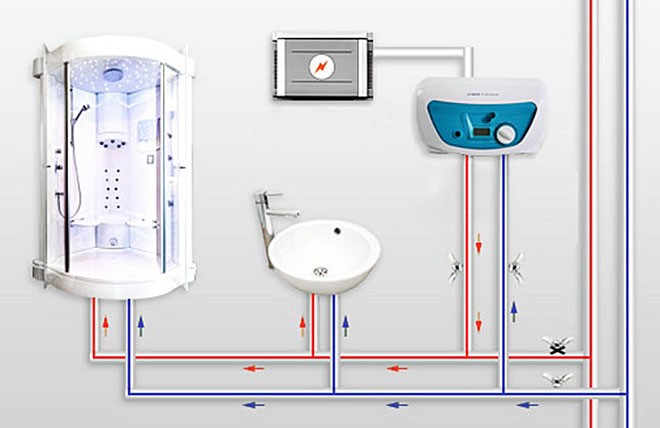
Pressure type devices have great performance and electrical power. Schemes based on them are built if it is necessary to provide several points with hot water, for example:
- kitchen;
- bathroom;
- shower stall;
- toilet, etc.
In this case, the heater is mounted near the riser or at the point of maximum water consumption. With a large length of the supply pipes, they are thermally insulated using foam rubber sleeves. The installation site should also provide convenient access for the maintenance of the device.
General wiring diagram
Instantaneous electric heaters are resistant to high humidity and the accumulation of condensed moisture.
Wall Mounting Procedure
Despite the small weight and dimensions of household flow-through heaters (as compared with storage heaters), they should be taken very seriously to fixing them to the wall.
Reliable fastening is provided by such walls as:
- concrete;
- brick;
- wooden.
Installation on partitions made of giprok, even moisture resistant, is not recommended.
It is necessary to install the device strictly vertically, without distortions. With a significant deviation from the vertical or horizontal, an incomplete coating of the electric heating element with water is possible. This will lead to overheating and failure of the device.
If special brackets or other fasteners are included in the scope of delivery, their use is mandatory.
Leading manufacturers supply their products with a paper or cardboard template on which holes are already marked. Its use saves time and helps to correctly place the device on the wall.
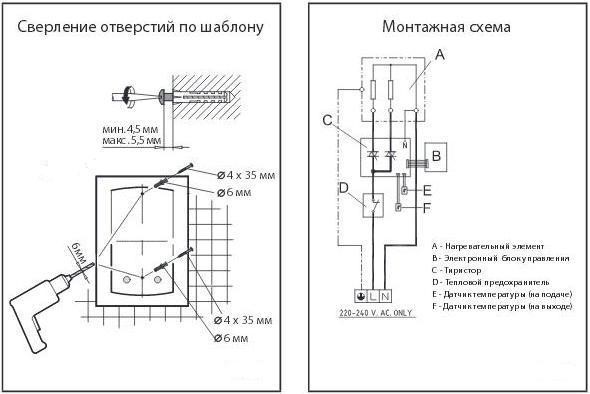
Mounting templates and schemes from the manufacturer
To install the device you will need a drill and drill suitable for the material of the walls.
The installation sequence is as follows:
- make sure that the heater is in the “Off” state;
- remove the case;
- mark the mounting points according to the template;
- drill holes, insert dowels;
- wrap screws;
- install brackets or other means of fastening (if provided);
- hang the device on the wall and check the installation angles with a level or plumb.
Important! It is strictly unacceptable to use a flow heater on temporary mounts, for example, on a rope suspension.
Electrical connection
Important! Before starting electrical work, make sure that the cable is not live.
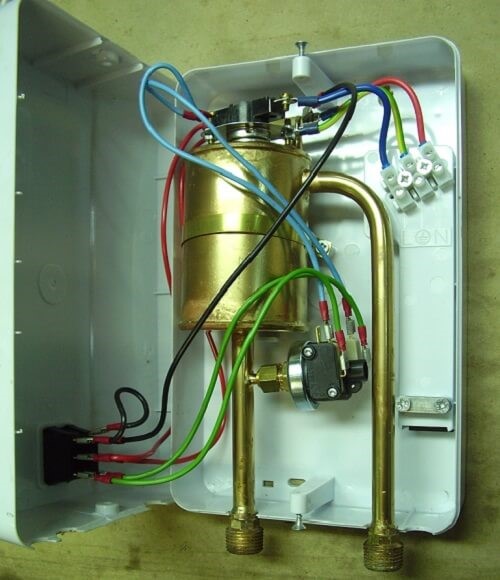
The end of the cable should be pulled into the housing opening so that it is not taut and does not break inside the device. The top layer of insulation is removed by 50-70 mm. From live conductors, insulation is removed by 7-10 mm. These tips need to be cleaned with a file or just a flat screwdriver and inserted into the mounting box in accordance with the notation. Tighten the screw terminal fasteners “all the way”. Reliable contact will prevent sparking, overheating and failure of the device.
As with any electrical equipment connected in high humidity conditions, the power supply circuit must be equipped with a Charge Disconnect Device (RCD). When a leakage current appears, it will instantly turn off the device, eliminating severe injury to a person by electric current. The closer the RCD is mounted to the protected device, the more effective its operation and more reliable protection. If the heater is mounted in a private house, the RCD must be installed on the distribution panel closest to the heater.
Mains connection
Water Connection Options
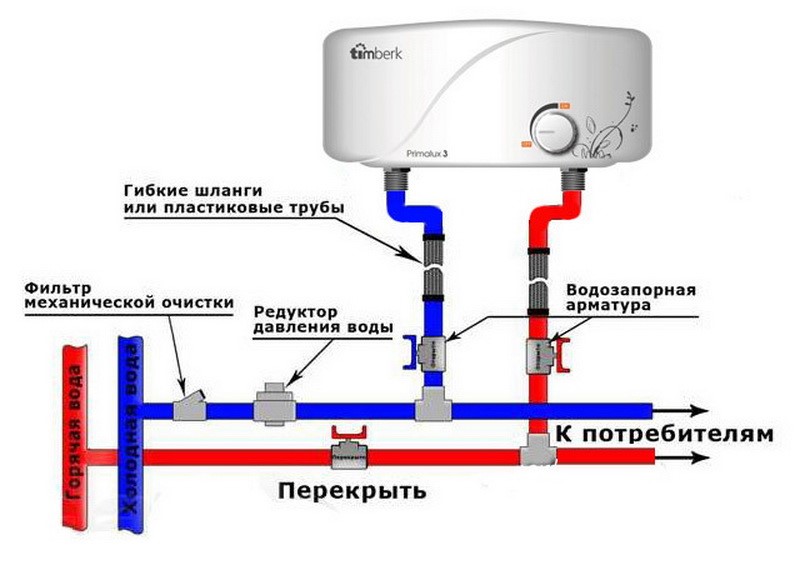
Ways to connect water to the device vary at the installation site:
- Top connection. The device is mounted above the water folding unit.
- Bottom connection. The device is installed under the sink or on the side of it
Depending on the type of wiring, the connection is distinguished
- To the pipes hidden in the wall. When connecting, the corners are first mounted, and the device’s nozzles are connected to them through the “American” coupling.
- To openly mounted.
On the body of the device there are two nozzles - one for cold water and one for hot water.

Connection to hidden and open pipe wiring
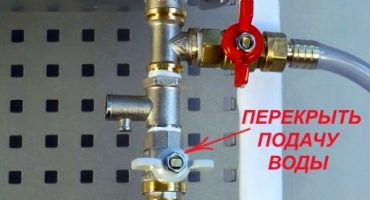
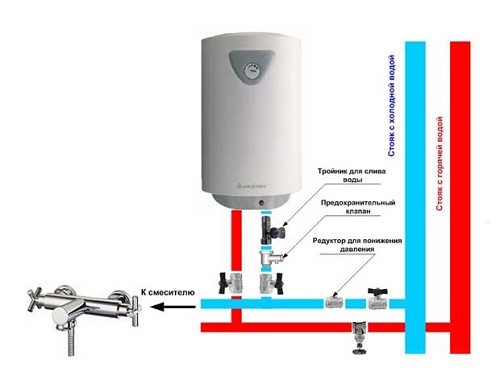
The water heater is connected to a centralized cold water main or to a storage tank. In any case, you need to monitor the presence of water at the inlet and maintaining its minimum pressure. When connected to pumping stations that lift water from a well or well, a mechanical filter should be used to purify the water.
How to install and connect a instantaneous water heater
Before choosing a model and installation scheme for a water heater, you should determine its purpose. Technical characteristics follow from it.Below are the nuances of connecting and installing a instantaneous water heater to power grids and water supply in specific conditions.
In the apartment and in the country
Suitable temporary devices of low power with a small daily flow rate. They are installed in case of disconnection of hot water in a city apartment or in a summer cottage. For stable operation of the non-pressure device, it is mounted 2 meters above the tapping point.
If in the house or apartment there is no centralized hot water supply, it is better to choose a powerful pressure vessel and a hot water pipe wiring system. Such devices are designed for year-round use and require a minimum pressure in the line from 1.5 to 2 atmospheres.
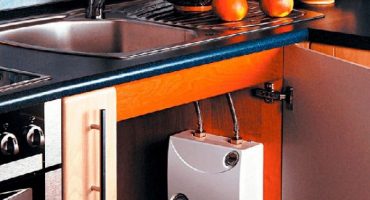
In the bathroom and in the kitchen
Install low-power devices designed for a single consumer.
To the mixer
A low-power flow heater is connected instead of a spout or a shower hose of the mixer. Such a scheme is used as temporary.
To the water supply
Below is a diagram that allows consumers to be supplied with hot water, both from the main and from the heater.
Water connection scheme
Electric - to the mains
One of the options is shown in the diagram. RCDs should be placed as close to the heater as possible.
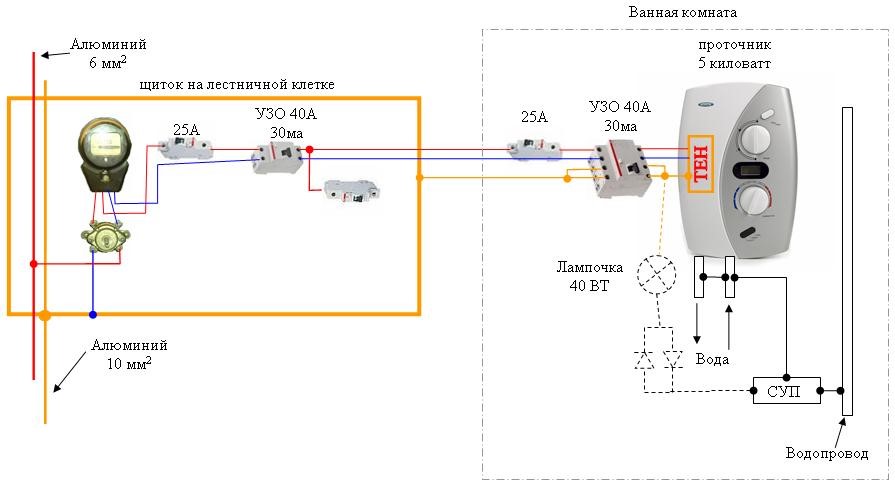
Electrical connection. (SOUP - feed control system)
Electric shower
Low power devices designed for a single water consumption point are often equipped with a spout and / or shower hose with a watering can instead of an outlet pipe.

Examples of installation of a water heater for a shower
It is completely unacceptable to install taps or other valves on the outlet pipe of such devices. When the heating is on, this will lead to overheating and failure.
Gas
If main gas is supplied in an apartment or in a house, a gas heater will be a convenient, safe and economical solution.
Gas appliances have high power and easily provide several consumers.
To install such an apparatus, coordination with local gas services is required
Gas water heater connection diagram