Uninterrupted operation of any boiler is ensured by regular preventive cleanings and the replacement of some parts. This rule cannot be ignored, otherwise even high-quality units fail many years earlier. But you can figure out how to dismantle the water heater with your own hands and save on multiple specialist calls. About this article.
When is it time to disassemble the water heater
The first two years the structure can be operated without maintenance if the quality of the tap water is satisfactory. The simplest and most obvious signs of poor-quality water:
- rusty shade;
- the presence of sand or other suspensions;
- gray or yellow scale in the kettle;
- bad smell.
If the water supply is heavily contaminated, a new boiler will need to be cleaned in a year.
High-quality or filtered water forms a minimum of scale on the walls of the tank and the heating element (TENE). However, after two or three years, even this small layer reduces the heating time of the water and increases the consumption of electricity. At this stage, the crust of deposits is better to remove: the installation is forced to first warm up the coating, and only then water. Over time, as the plaque thickens, the pipes gradually overheat, and the heater fails.
Tip: to reduce the amount of scale, the temperature relay does not need to set a limit temperature. Let the water be hot, but not reaching the boiling point (sixty to seventy degrees).
After the first two years of operation, cleaning is carried out every year. In some cases, more often (once every six months) or less often (once a year and a half). Here are the guidelines indicating that you need to hurry with the installation analysis:
- when you turn on the heater begins to make a slight hissing noise;
- the water heater often turns on and off;
- water warms longer;
- small pieces of scale come out of a warm tap;
- when touched, an electric shock is felt;
- the body is leaking.
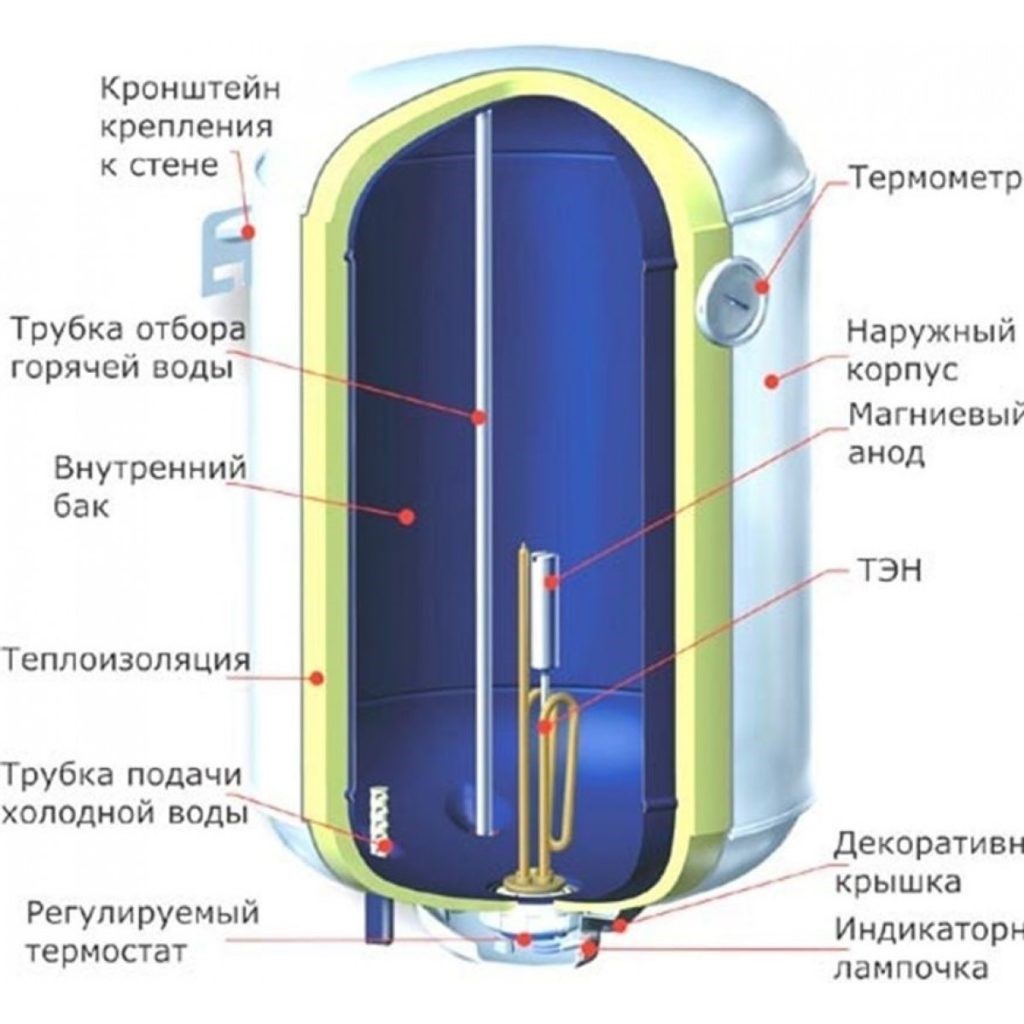
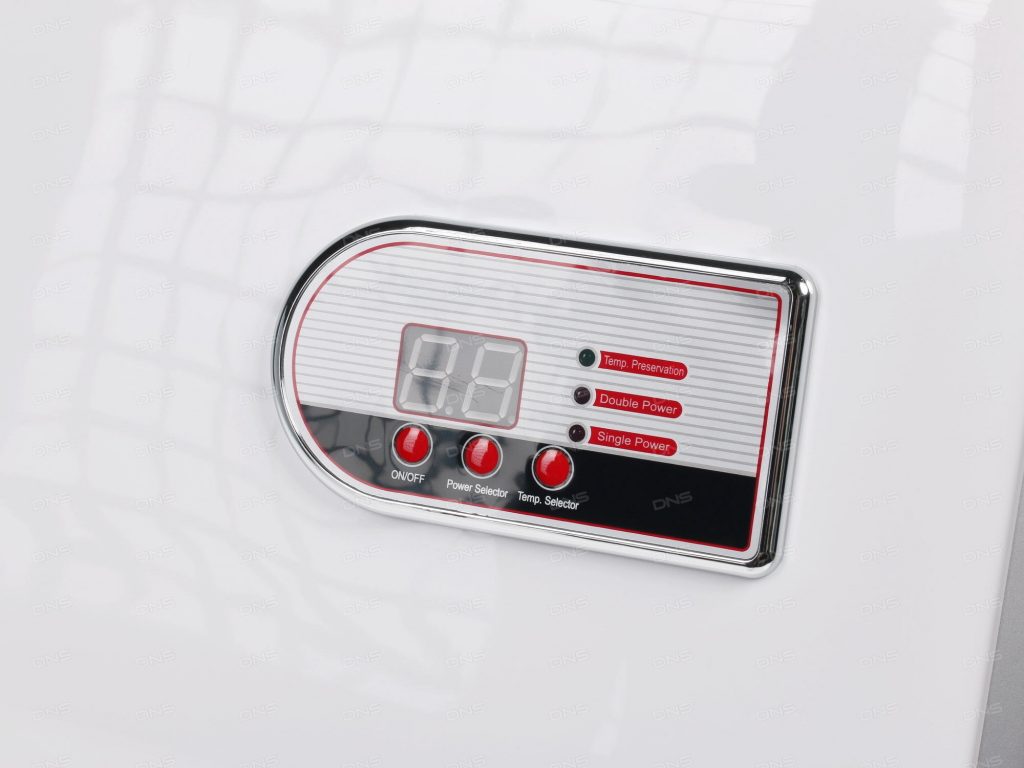
Water heater device
In addition to preventive cleaning, regular (approximately every two years) replacement of the magnesium anode is necessary. Its presence provides protection against corrosion and extends the life of the unit. From time to time, other parts need to be replaced: gaskets wear out, the heater breaks.
What may be needed
- Adjustable wrench - to disconnect pipes.
- Wrench - to unscrew the bolts securing the unit to the wall (not required if mounting on hooks).
- The hose to the return valve or to the water inlet is for drainage (not required if containers for collecting water are used).
- Phillips screwdriver for loosening the protective cap.
- Two flat head screwdrivers: needed to raise the protective cap, which is too tight.
- A gas wrench number two or a wheel spanner for 55. Sometimes, to tighten the nuts, it is preferable to use a socket wrench.
- Thin screwdriver for loosening and removing power wires.
Dismantling of boilers is preceded by preparatory stages:
- blackout installation;
- draining;
- removal from the wall.
First, the device is disconnected from the outlet. Then it needs to be lightened as much as possible by removing water.An eight-liter heater weighs about twenty kilograms. With water, its weight approaches the center.
How to facilitate a boiler
The unit has nozzles: through one, cold water goes inside the device, hot water flows out from the other. The inflow and outflow of water can be through pipes or flexible hoses. Typically, the nozzles are equipped with taps.
A simple way to drain - through the safety valve
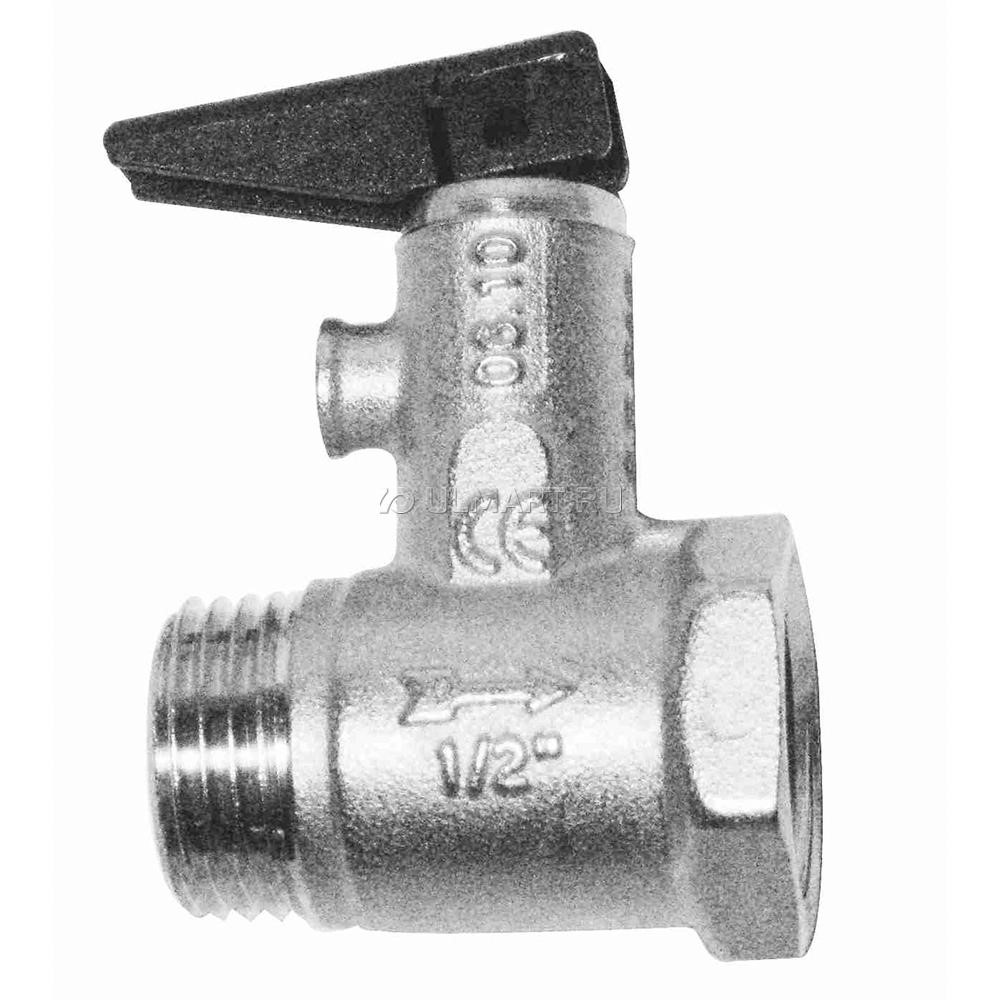
Safety (check) valve
On the pipe with cold water in front of the pipe there is a valve. It is needed to discharge water when the pressure inside the device exceeds the permissible value. It works automatically. The valve is equipped with a nozzle (water emerges from it in an accident) and a valve similar to a handle. The handle is checked every month to verify that the valve is functional. Normally, with the handle open, water drips from the spout.
When you need to free the unit from water, first stop its flow at the entrance to the house.
Next, screw the hose from the "hot" pipe. This provides free air entry. On the safety valve, the valve handle is opened. At the same time, water will pour out of the spout. Under the stream you need to substitute an empty container with a volume of at least twelve liters. You can put a hose on the nozzle and drain the water into the sink or bath.
Water draining through the valve takes a long time, at least two hours. When the valve is partially clogged, runoff lasts up to four hours. Water does not flow from the valve spout at all when it is completely clogged or damaged. It will have to be released differently.
The best way to drain is through the cold water pipe.
First you need to make sure that the installation is de-energized, and the water supply to the apartment is shut off. Then close the tap on the “hot” pipe. Substitute the drip tank. Unscrew the junction of the safety valve with the cold water supply pipe with an adjustable wrench and disconnect them. Then unscrew the nut of the junction of the valve with the “cold” pipe. Water hardly flows out of the boiler, as the air is shut off.
Unscrews the joint of the valve and the flow of water into the installation
If you open the faucet on the hot water pipe, air intake starts and water flows from the “cold” pipe. Regulate the force of the water flow by covering the tap. If there are no taps on the nozzles, air can flow through an open, common hot tap. In this case, all the water from the tank is drained quickly, in five minutes. You can verify this by watching the video:
Not always the boiler is located directly above the bath. Then you have to pour about ten buckets into the sewer on your own. The matter is simplified if you put a hose on the cold water pipe to divert it to the bathroom.
A quick way to drain - through both nozzles
First, the “cold” pipe is exempted from the connections, and then the “hot” pipe is released. Water drains instantly from both openings and releases the tank in a maximum of two minutes. It must be borne in mind that in this case it is impossible to control the water flow, therefore, the method is suitable only when the heater is located directly above the bath.
Note: after draining the water, a small part of it still remains inside.
You can remove water to dryness if you disassemble the water reservoir. However, this is optional. In order to dismantle the installation, a drained volume of water is enough.
How to remove a water heater from a wall
In the back of the boiler there is a plate with holes for mounting to the wall. At the same time, anchors with hooks are fixed in the wall, on which the unit is suspended through these holes. The heater freed from water is disconnected from the pipes (using an adjustable wrench) and lifted so that it is easy to remove from the hooks.
Mounting the boiler to the wall on hooks
Sometimes the device suspended from the wall is additionally fixed with bolts. In this case, you first have to unscrew the bolts with a wrench, and then remove the installation from the wall. The removed boiler is turned over and put on the floor with the pipes up - so it will be more convenient to dismantle it.
Note! Ariston models with oval flanges cannot be turned upside down, since the heater can fall inside. They are dismantled without removing from the wall.
Removing the housing cover
Inexpensive heaters without adjustment devices usually have two screws on the bottom of the case. They need to be wrapped with a Phillips screwdriver and the cover removed. If the lid fits too tightly, you can pry it off with flat screwdrivers.
A special place is occupied by models with oval flanges. Dismantling them is carried out directly on the wall, turning upside down fittings is undesirable. Near the fittings (they are marked in blue and red) are two bolts, unscrewing which you can remove the cover.
On some models, it is not immediately possible to immediately find screws to remove the cover. They are hidden under the stickers. After removing the stickers, you can unscrew the housing cover. Sometimes before removing the cover, you need to remove the plastic shields and plugs from the screws.
What's under the hood
With the cover removed, the wiring of the heater is visible, which must be turned off. Before doing this, it is necessary to sketch or photograph the initial position of the wires. This is useful in the reverse phase of assembly. After photofixation, you can unscrew the bolts of the wires.
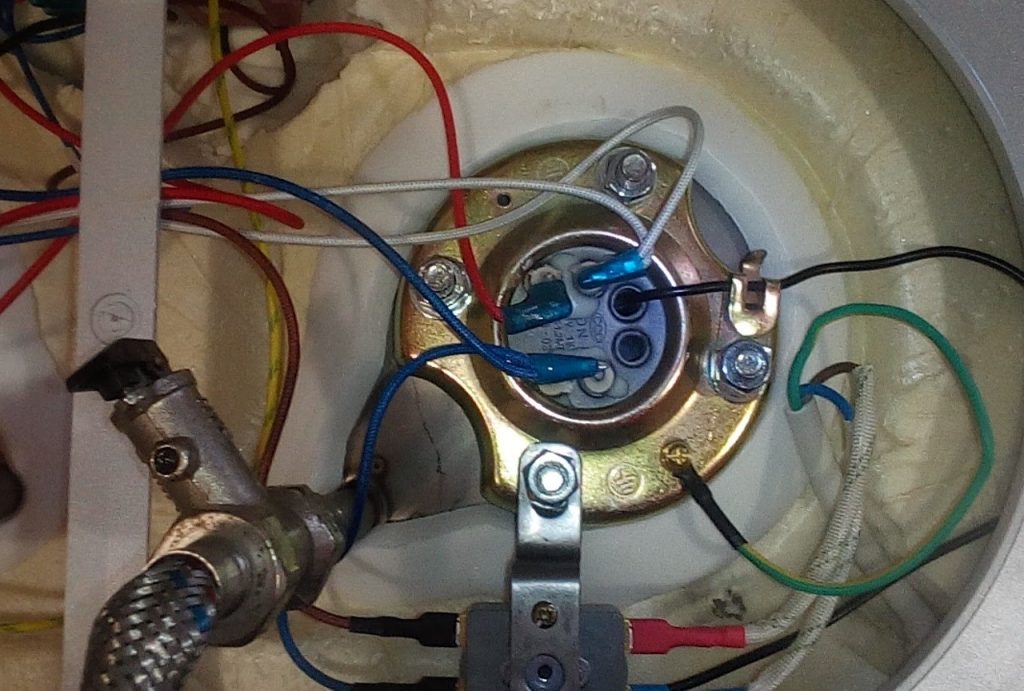
Wires under the removed housing cover
Many models have a thermostat under the cover. To remove the device, it must be firmly grasped and pulled down. To do this is better with a sharp, but precise movement. You can watch the video in detail:
Some Ariston models have a thermometer on the case. To remove it, after parsing the electrical circuit, the device is pried off on both sides by flat screwdrivers. This allows him to pop out of the slot with a click. Next, carefully pull the wires disconnected from the thermostat.
Some boilers are designed in such a way that a check valve can prevent the removal of the cover. Then you need to unscrew it. A temperature sensor is sometimes attached to the lid on the back side. It must be removed by disconnecting the contacts from the heater.
In Termex boilers, an electronic control board (power unit) is located under the cover. It is fixed with self-tapping screws and is also easily removable. The control board and the external sensor board are connected by connectors that need to be unscrewed. The grounding attached to the nuts is also disconnected.
How to remove the touch screen from a Termex water heater
The control and external boards connect the ribbon cable. It is disconnected from the power unit and a thin half-meter cord is tied to it. Then, on the front side of the case, carefully and carefully peel off the sticky plastic sticker on the touch screen.
Touch screen plastic sticker
In the slot that opens, the display module panel is mounted on self-tapping screws. Unscrewing them, you can carefully remove the module and pull out the ribbon cable. If the cable gets stuck, you can pull it down with a tied cord and try again to remove it with the module.
How to remove a heater
In the simplest case, the heater is held on a single nut, which is unscrewed counterclockwise with a fifty-five spanner. If the heating element comes out of the hole with difficulty due to huge deposits of scale, it may be better to replace it.
In devices with an oval flange, you will first have to unscrew the nut on the bar holding the flange with the heater. TEN extends after some scrolling. In this case, it is necessary to substitute a container under the tank, since part of the water is still inside and will pour out when the part is displaced.
Sometimes the flange is held by five or six nuts. It is convenient to twist them with a socket wrench. There can be two heating elements. In this case, before disassembling the connection, it is better to fix it in the photo. This will facilitate installation.
Actions after dismantling
The tank is descaled and washed. The plaque is carefully removed from the heater without damaging the coating (for example, with a plastic knife).Then you need to hold the part for 24 hours in citric acid, which will remove those layers that cannot be removed mechanically. If necessary, the heating elements are completely changed. If required, replace the magnesium anode.
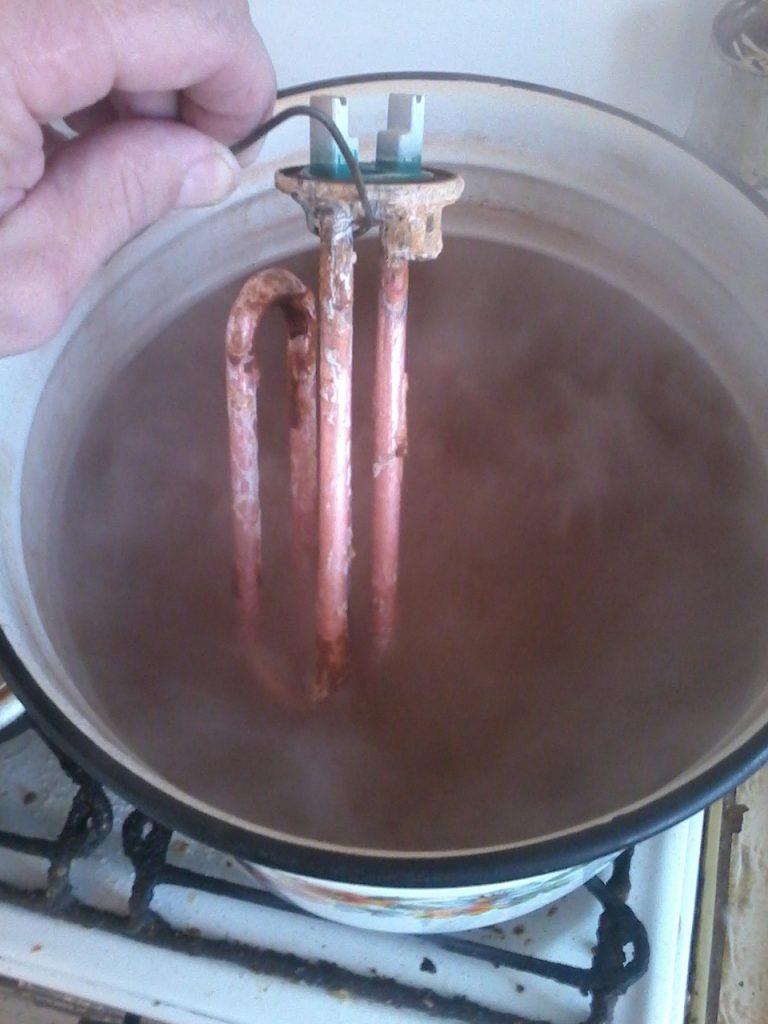
TENA cleaning
When assembling the unit, all parts are dried. It is convenient to use a hairdryer for this. It is worth paying attention to the integrity of the gaskets so that the sealing is completely restored. When installing an electrician, you should always refer to photographs that were taken before repairs or cleaning were carried out. This will help to restore the system correctly.