So what to do if the fan in the bathroom clogged or the floor in the room breaks down? Most often, the cause of the breakdown and the repair method are hidden inside the device. However, depending on the purpose, the fans have different structural schemes, which means that the analysis of each type will have its own characteristics.
Fan
Today we will consider the features, the main malfunctions, the process and the algorithm for disassembling the exhaust, duct and floor fans.
Bath fan
These devices are installed inside the exhaust openings. Most often, the exhaust mechanism fails due to the blown fuses located on the engine inside the fan. And for repair, the fuse must be replaced. To do this, you need to get to the engine in the middle. For disassembly, you only need a screwdriver.
The parsing algorithm is as follows:
- Remove the mechanism from the wall. Disassembling the device is a pretty delicate job, so it will be very difficult to get to the engine without removing the fan from the wall, plus there is the likelihood of even more damage during disassembly.

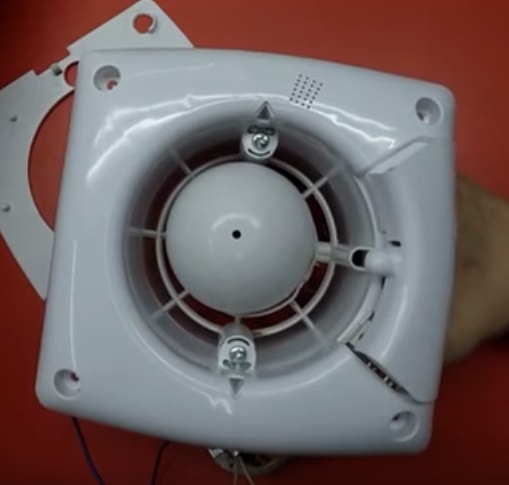
Assembled bathroom fan
- Remove the protective plate. The front protective part is attached to the mechanism, most often, with bolts, so removing it will not be difficult. You only need to choose the appropriate screwdriver.
- After removing the face plate, turn the fan over. It is necessary to remove the protective plate from the back. Unfortunately, the back side, most often soldered to the case, so it will have to be torn off. To assemble the mechanism, it is absolutely necessary to prepare glue of the “Moment” type.
- Remove the implement with blades. This element is not attached to the body in any way, since it needs torsion. Therefore, removing it is very simple.
- Flip device. Remove motor protection. This is an ellipsoidal element located immediately behind the front platinum. Unfortunately, it is also, most often, soldered to the body, therefore it must also be torn off, and glued during reassembly.
- Remove the power cables. When removing protection, you can already see the goal - the engine. From it through special openings are the power cables that are connected to the back of the case. These cables must be removed through the same holes.
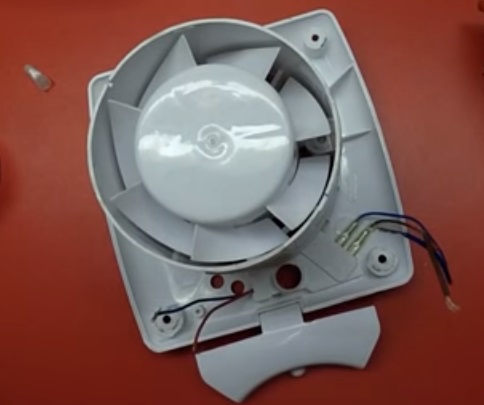
Front side
- Turn the mechanism over again. On the back side, at the place where the working blade element was, you can see several bolts (usually 2 of them). With these bolts, the engine is attached to the housing. They need to be unscrewed, and the goal will be achieved.
Having reached the engine, next to the winding you can find the same fuse. It is easy to remove and replace with a new one.
Backside
Exhaust fan
These fans are installed inside the cooker hoods, used to remove polluted air. The main problem in the operation of such an aggregate is dirt. During operation, the hood extracts a lot of dirt and debris inside. This leads to extraneous noise during the operation of the hood, as well as unpleasant odors. Cleaning appliances for exhaust systems, as well as the entire exhaust hood, in principle, is recommended at least once a year.
The complexity of the analysis of the exhaust device lies in the fact that the fan itself still needs to be reached. It is located in the middle of the hood, so without disassembling it, you can not disassemble the fan.
To disassemble the exhaust fan, you will also need only screwdrivers corresponding to the bolts that hold the main hood elements.
So, the algorithm for disassembling the hood and fan:
- Turn off the power to the hood.
- Remove the hood itself. The fan can be reached only from the upper side, which is attached to the pipe. The hood must be disconnected. It can be attached directly to the pipe, or, for example, to a cabinet. The hood is fastened with bolts, which means that an appropriate screwdriver is needed to disconnect.
- Put the hood on the table. Remove the grille from the bottom. A fan will open behind it.
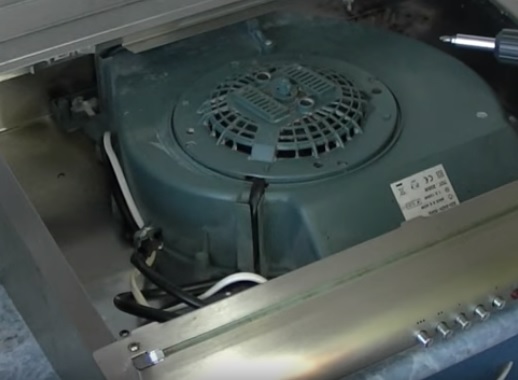
Cover
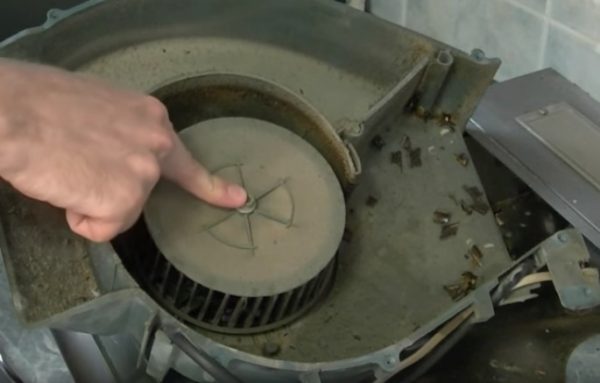
- Remove the protective cover of the mechanism. The working mechanism, blades and engine are protected by a covering casing, which is attached to the housing with screws. Put the hood so that the upper side is visible. On it you need to find screws fastening the casing to the body. These screws may not be noticeable due to dirt, so you need to carefully inspect the case. Must be at least 4 pcs.
- Turn over detached casing. Behind it is, in fact, the fan itself. The working blade element is attached to the casing with one bolt along the axis of rotation. It can sometimes be attached with a nut.
- After removing the working element, access to the engine is opened. It is attached to the housing in the same way as the fan motor for the bathroom - with two screws on the back. Bolts may have protective rubber caps.
After disconnecting the engine, you can proceed to cleaning the casing, housing, working element, etc. Before reassembling, it is important to check the connectors for corrosion in order to prevent their destruction under the own exhaust mass. If you compare the algorithm with disassembling the fans for the bathroom, then in this case you do not have to tear anything off, and, accordingly, stick it on. Everything is connected by bolts, which means that it can be disassembled without destruction.
Mounting the working mechanism
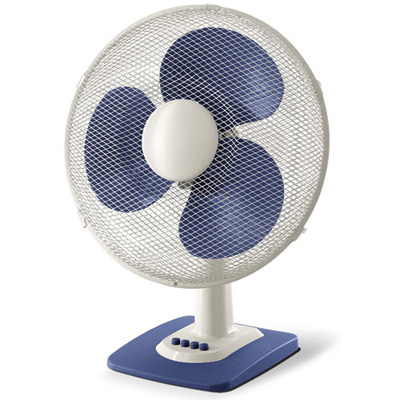
Floor fan
Although these fans have long since given way to air conditioning, they are still heavily used in many homes, apartments or offices, especially on hot summer days. Such an assembly requires disassembling, since over time the working mechanisms become clogged and corrode. As a result, the working pendulum mechanism accelerates more slowly, the blades do not get the necessary speed of rotation, and the fan loses its performance.
Preventive cleaning and lubrication of fan parts is recommended annually before the start of the season, as it becomes clogged during storage. You will need a screwdriver to disassemble.
Outdoor fan parsing algorithm:
- Remove the protective grill. It is attached by three special levers that are easily opened by hand.
- Detach the blades. They are attached with a nut on the axis of rotation. The nut is made so that it can be unscrewed by hand. Its peculiarity is that when ordinary nuts are unscrewed counterclockwise, the blade fixing nut is unscrewed clockwise, and twisted counterclockwise.
- 3. Remove the bearing and inner grill. It is also attached with a nut, but this nut must be unscrewed as usual, counterclockwise.
- 4. Unfasten the machine operating mode button. It is easily removed by hand.
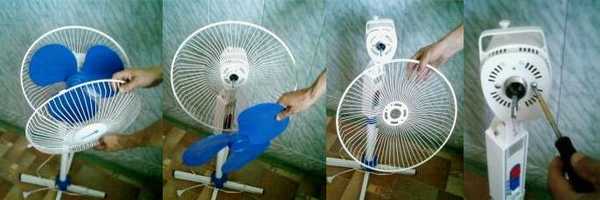
Removing vanes, protective grilles and casing
- Detach cover. The main operating mechanisms of the fan are protected by a casing. It is attached to the case with two screws on the front of the fan and one screw on the back. It is important to exercise caution when removing the cover after unscrewing the screws. Immediately behind it are all the working mechanisms connected by cables, so carelessness and damage to the motor or cables can be avoided by removing the cover.
- Remove the swingarm. It is located on the back of the fan, and is fixed with the same bolts. Disconnect carefully while watching the cables.
- Check the rotation of the main working axis.If the axis rotates freely, it means it has not rusted; if it rotates heavily and with a creak, lubrication is necessary.
- Get out the engine. It is located in the metal so-called "Box". This box is bolted to the back of the fan. After opening the box, you must be especially careful, as there are 4 small cables inside that must not be damaged under any circumstances.
After removing the engine, full access to the main working axis of the machine opens. It must be checked for rust and various deformations. If corrosion has been detected, the axle must be cleaned of it without damaging the threads. If the cause fan malfunction steel deformation of the axis, it needs to be replaced.
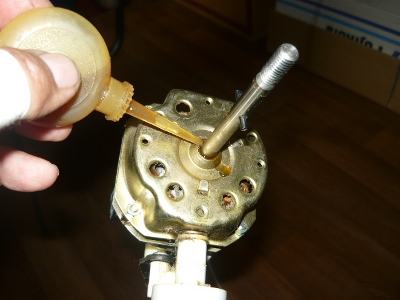
Fan axle lubrication
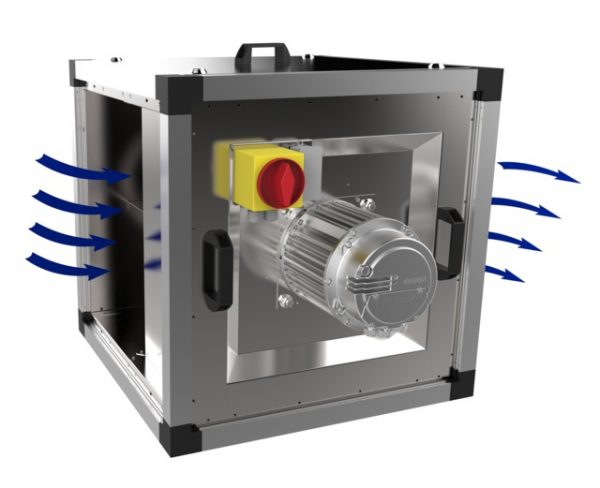
Duct fan
Today, the most popular type of fan is precisely ducted. The reason is that the principle of its operation is similar to the principle of functioning of an air conditioner. It not only cleans the air, but also maintains it at a certain temperature. With all this, the channel type in its structure is the most difficult to repair. Therefore, few are able to independently identify the cause of its malfunctioning.
There can be several reasons, by the way. From commonplace pollution to overheating of the electric motor. The reason, characteristic only for the channel type, may be the need to change the direction of the channel. In any case, the mechanism requires disassembly and thorough inspection.
The duct type fan itself is only part of the air filtration system, but its most important part. It directs air to the filtration and purification system.
Disassembling a fan depends on many factors. First of all, this is a way of its factory assembly. Parts can be connected by bolts, screws, etc., and can be welded. In addition, duct fans are assembled specifically for the filtration system. Depending on it, the design and assembly scheme may be different. Therefore, the disassembly of the most popular type of channel fan - square will be described.
To disassemble, you will need a screwdriver and pliers.

Incision
Square fan duct disassembly algorithm:
1. Turn off the power.
2. Disconnect the operating unit from the filtration system. The fan is the edge of the system, so it will not be difficult to separate it. The pipeline is led by one of the walls of the mechanism. As a rule, the pipe is not welded, but bolted. Therefore, it is easy to separate it with a screwdriver.
3. Remove the machine from the wall. As with the bathroom appliance, the duct cannot be disassembled without being removed from the wall.
Important! Before removing, make sure that the fan is completely disconnected from the pipeline to prevent deformation or destruction of the pipes.
After dismantling, the whole mechanism is, in fact, a fan inside a large square box. Using its walls, the direction of the collected air is regulated. Therefore, if a change in direction is required, the box will be the main element of disassembly. The device itself, in this case, does not require disassembly. If it is necessary to check the engine or assess the integrity of the blades, it is necessary to dismantle and disassemble the fan itself.
4. Remove the blades. They are attached to the electric motor with a nut on the main working axis. The nut is easily unscrewed with pliers. The electric motor itself in most cases is welded to the box, so it is most often not dismantled.
5. After removing the blades, access to the engine is opened. On the back side, as with other types of fans, it is bolted. When removing and inspecting the engine, be careful not to damage the cables.
Backside. Motor cover
In addition to square, other channel-type devices are also widely used in ventilation systems. Their shape depends on their purpose and location. However, the difference between these machines is only in the forms of their "boxes".The fans themselves operate in an identical manner, and, therefore, are disassembled the same way.
To summarize, we can confidently say that fans are not such a complex system. They are quite simple to assemble and disassemble, but require accuracy and literacy. And if their dismantling and maintenance in proper condition is made systematic, then with time disassembly will become a familiar and simple process, and the mechanism will last much longer.