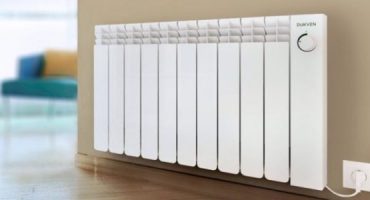
A heater is a device that is very necessary in everyday life. You can purchase a finished model, or you can assemble such a device yourself. It is important to determine its appearance and functionality in compliance with all safety standards.
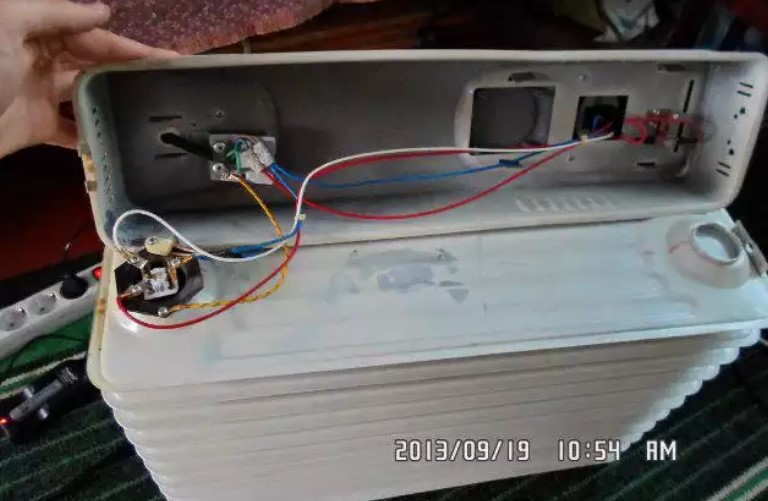
There are enough masters among the people. Examples of their creations are presented in the photo.
Home appliances can be with:
- Directly heated air. In this case, natural convection is realized. This is an electric fireplace.
- Forced blowing of the heater. This is a heat fan.
- Indirect heating of air. In them, the properties of claim 1 and claim 2. This is an oil model, or a water-air one.
- Radiant surface. This is an infrared model (IR). Another name is thermal panel.
You can also build a fiery autonomous modification. His work is based on the waste heat of the heating and cooking equipment. Or to assemble a solar (natural) heater, but it is very difficult.
Creating an IR Model
Do-it-yourself infrared heater is quite difficult to do. But this is the most effective and safe modification.
Often create a model with two-sided radiation with a power of 400 watts. With its help, a room of 12-14 sq.m. can be heated to +18.
Financial expenses for such a project are not large. There are IR models in two variations:
- The most distant radiation from the red zone of the visible spectrum.
- With radiation with long waves.
They produce soft warmth. Since the heat-emitting components (emitters) have a relatively weak heating. Therefore, it is important to do them correctly.
Also, with the correct assembly, the thermal panels in operation almost do not wear out. Their reliability is limited only by sudden external influences.
To create a radiator, a thin conductor of a flat shape is used. Its material is characterized by serious electrical resistance. The conductor is clamped by two dielectric plates. There is also a transparent option for IR.
Thin-film technology is used to create heaters, and special combined plastic is used to form the lining. But in domestic conditions this is not feasible.
And often, a home-made heater is created with emitters based on carbon material. It turns out a coating clamped between two glasses. But in practice, this is a rather weak version. It turns out many vulnerabilities. They quickly burn out.
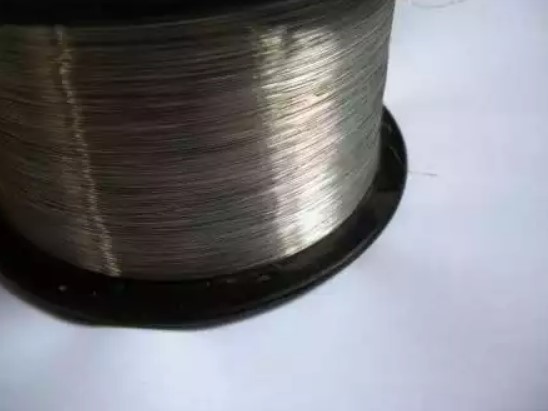
The most suitable material is nichrome wire
It is important to conduct a competent calculation.
A window glass of 3 mm thickness is used. Without the threat of overheating, a current flows through it with a parameter of approximately 8.5 W / sq. dm IR. From the “sandwich” of the radiator, 17 W diverges on both sides. For example, your emitter will have parameters of 10 x 7 cm. It is not difficult to make a lot of similar elements from residues. So one emitter will cope with a room with a power of almost 12 watts.
For example, the planned power of your unit is 500 watts. This indicator is divided by 12. It turns out 41.7, Rounded 42. This is the number of radiators needed.
By design, a panel is a matrix. In it, a 6 x 7 matrix is obtained from the emitters. Their parameters, excluding the frame, are 60 x 49 cm. And with it: 75 x 55 cm.
We calculate the absorbed current from the household network - 2.27 A. This is the result of dividing 500: 220. We determine the resistance of the entire device - 97 Ohms. This is the rounded result of dividing 220 W: 2.27 A. To find out the indicator of one emitter, divide 97 by 42.It turns out 2.31 ohms.
The indicator of the used material (nichrome) is 1 Ohm / millimeter square. It is necessary to solve the problem with the wire (its cross section). Does it fit into the gap between the glass used.
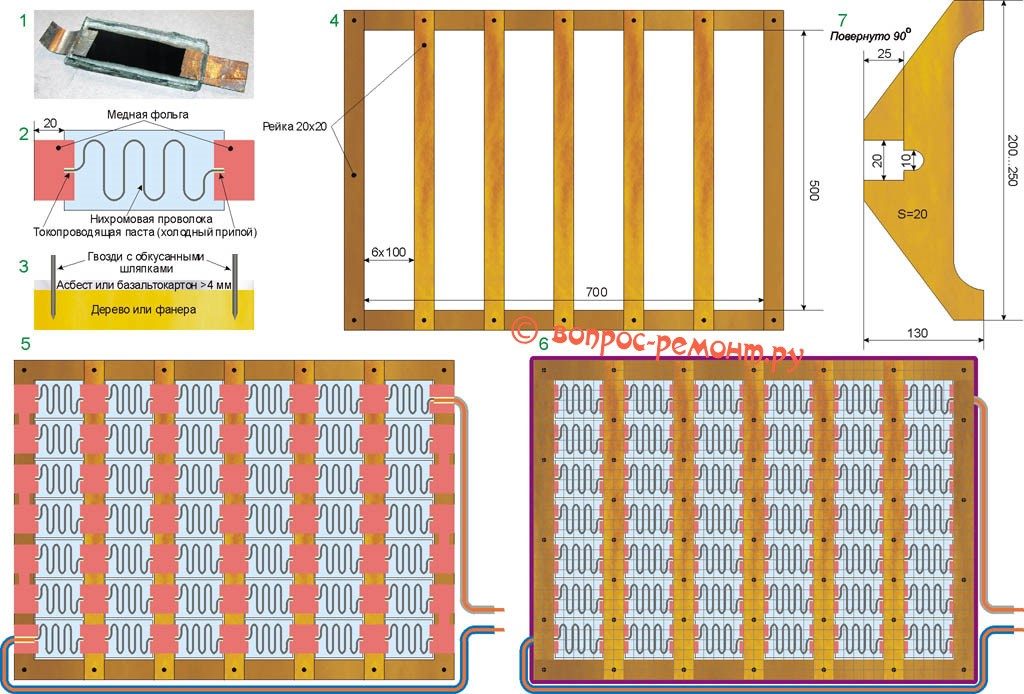
Example of a diagram and drawing of a device made by do-it-yourselfers
Nichrome spirals are in contact with oxygen. By current density 13-18 A / sq. Mm. Their glow is characterized by dark and light red shades. It is 600 - 800 C.
For example, the current (density) is 16A / sq. mm With these data, an indicator of 700 C is formed. If IR freely emits waves, then the current density along the square root affects the temperature of the wire. If you reduce it by half, you get a functional temperature index of nichrome 175 C. Silicate glass will not suffer from this.
The temperature data of the external plane of the emitter does not exceed 70 C. Moreover, the room temperature is not more than 20 C. In terms of heat transfer, this is an acceptable indicator. But surfaces with radiation are still better covered with a defensive net.
The nominal indicator of the operating current is 2.27 A. The result is a wire cross section of 0.28 sq. Mm. This is the result of the calculation of 2.27: 8. The diameter of the material is determined by the arithmetic formula. This is 0.6 mm. If with a reserve, then 0.7 mm. The power of the device is 460 watts.
1 meter of material (wire) with a given diameter has an indicator of 2.04 ohms. This is a square of 0.7.
To calculate the resistance of one emitter at 2.31 ohms, you need 1.13 m of material.
The width of the wire is 5 cm. 1 cm is a reserve from the extreme sides. It takes 1 mm to rotate - nails. Add on 2.5 mm. It turns out 5.25 cm on a wire branch. How many branches do you need? Calculation - 113: 5.25 = 21.5. This is the number of branches. Their total width is 1.54 cm. This is the result of a multiplication of 22 x 0.07.
The length of the snake is 8 cm. (1 cm is a reserve from the short extreme sides). The packing factor of the material is 0.19 (1.54: 8).
Next - the stage of development work (R&D) and design.
OCD
Model using IR silicate glass
Since IR silicate glass is used, sharp changes in thermal conductivity and transparency are observed in products of different brands. For this reason, make and test one emitter. Based on test results, you may need to vary the diameter of the material.
The following arithmetic principles for quartz installations should be considered.
Material Parameters
0.5 mm: power - 350 W, current - 1.6 A.
0.6 mm - 420 W and 1.9 A.
0.7 mm: 500 W and 2.27 A.
0.8 mm: 530 W and 2.4 A.
0.9 mm: 570 W and 2.6 A.
Thin wires are distinguished by a solid radiating surface. When using thick versions, surpass the IR power that glass can pass.
Testing
The finished product is placed vertically on a non-flammable surface. It is supported by a heat-resistant object. A current of 3 A is supplied to the product. A digital tester is used to monitor the current.
Need to check the behavior of the glass. If it quickly heats up and cracks quickly in half an hour, it is not suitable.
After 1.5 hours, the radiation power is checked. Place your palms parallel to the radiating planes. The distance from them is 15-17 cm. Keep at least 3A min. Then 5-10 minutes will feel soft heat. If your palms are burned immediately, you need to reduce the diameter of the wire. If even after 20 minutes there is not even a slight heat, the material is needed thicker.
Principles of Snake Bending
It is necessary to rely on such a scheme according to the type of battery
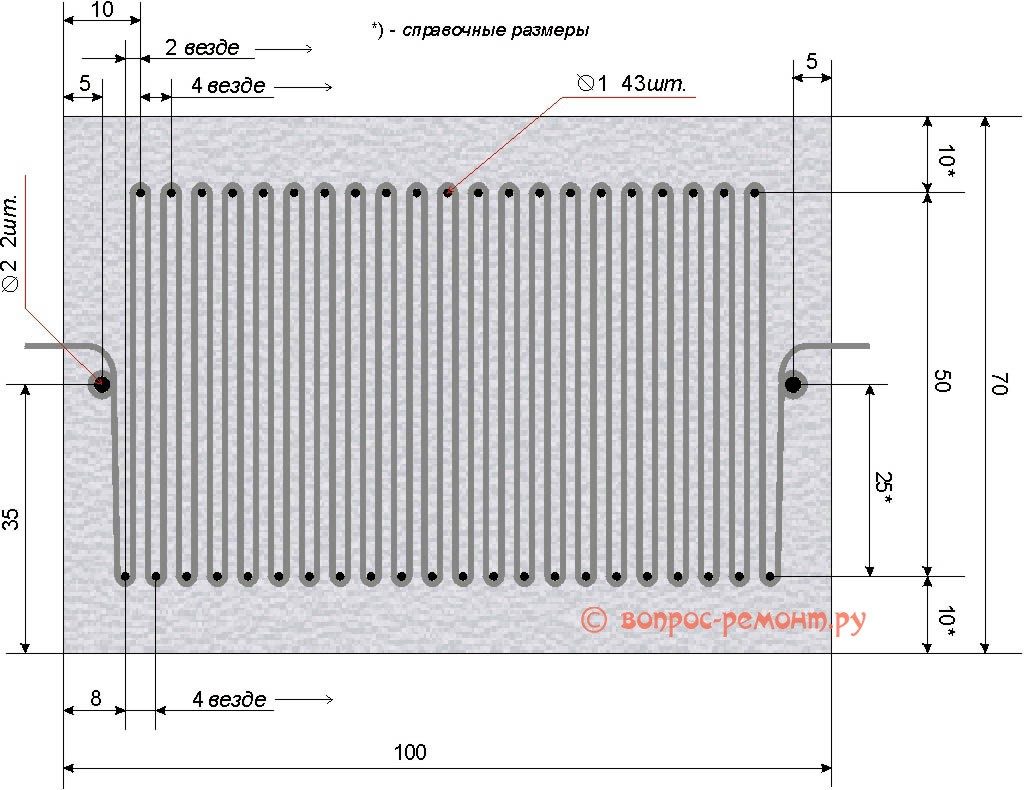
The plates are cut according to the parameters of glass. They remove contamination. Ears are attached to one cover. Their parameters: 2.5 x 5 cm. The basis of such a film is copper foil. It is glued with superglue. The ear goes into the lining 5 mm. Sticks out at 2 cm.
The formation of a snake needs to be done on a special template. A minimum of 5 cm is allocated for the tails. Bitten nails are used. They are ground to roundness.
The wire is wound on a pattern. Be sure to anneal to fix the form.
A voltage of 5-6 V is applied to the snake. When the material shines with a cherry shade, the thread should cool completely.This operation is repeated 3-4 times.
A plywood strip is superimposed on the snake. The snake is pressed by fingers. Ponytails that were wound around nails are slowly unwound (the parameter of the nail is 2 mm). Each tail needs to be straightened, molded. 25% of the turn is saved on the nail. Residues are cut flush with the extreme side of the template. And the tail residue of 5 mm should be cleaned, a sharp knife is used.
The snake is carefully removed from the mandrel, mounted on a substrate. The findings are in contact with the lamellas. You need to remove the snake with two knives. The blades are inserted from the outside under the bends of the branches on the nails (1 mm). Further, a winding heating thread gently pokes and rises. The snake is located on the substrate, slightly bent. The findings are in the center of the lamellas.
Nichrome is soldered to copper. The solder is a conductive paste. Liquid solder is dripped onto a clean contact (1 drop). Through a piece of polyethylene this section is pressed down by a small weight. When the paste becomes hard, the weight and polyethylene are removed.
Next is work on the emitter. Silicone sealant is pressed onto the center of the snake with a layer of 1.5 mm. Then the operation is repeated, but the layer is already 3-4 mm. A sealant fills the outline of the substrate. The distance from the edges is 5 mm.
Glass is carefully applied. Pressed down. It should lie tight. Next - waiting for the silicone to dry. This is about a week.
Then excess sealant is removed with a razor. With the lamellas, the inflows of the sealant are also eliminated.
Installation Question
When the emitter dries, the rails are prepared. They need hardwood. From the rails create two identical frames. The connection method is an inset in half a tree. The method of fastening is small self-tapping screws. Optimally these parts are created from PCB. Glass fiber laminate is also suitable. Other versions are not good.
Before assembly, the wooden components are coated with a water-polymer composition in two layers.
Created emitters are placed on one frame. For fastening lamellas, only liquid solder is used. The same connection is at the jumpers on the sides. With the help of them, all emitters are connected in series. For soldering lead wires used fusible solder. Flux paste is not active. Solder quickly with an 80 W soldering iron. The emitter should not stick out.
The second frame is superimposed. It indicates the location of the lead wires. Grooves are cut under them.
The first frame is going. Small screws are used. Do not make fastener points on live parts. For safety, all end parts of the panel must be glued with heat-resistant plastic, and the contact points of glass with frame elements should be coated with the same sealant.
Next are the legs. Their height is at least 10 cm.
A defensive steel mesh with 3-5 mm cells is superimposed on the sides of the panel.
Then you need to arrange the cable entry. A plastic box is used. It arranges the terminals and the light sensor. You can also put a voltage controller and a protective thermal relay.
Cable entry. Used plastic box
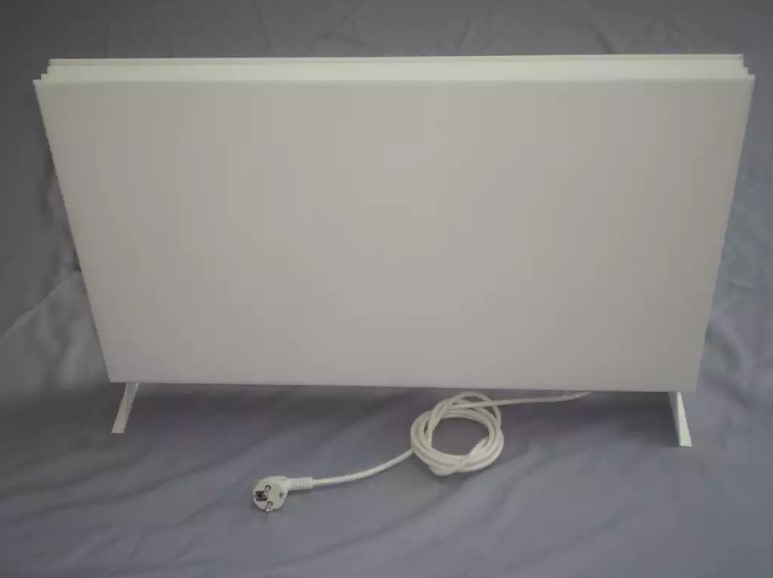
IR heater is ready!
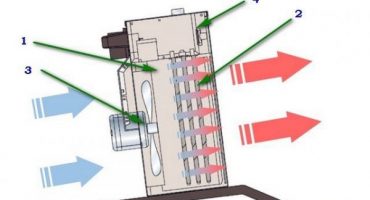
Creating a heat fan
It can be made with a voltage of 12 V. Power over 200 W - for this unit is too expensive a pleasure. And if you need a home-made reliable heater for a garage or basement, then a model of 100-120 W is quite enough.
The basis of the apparatus, designed for a garage, is an ordinary brick with through and identical voids. Its acceptable thickness: 8.8 and 12.5 cm. Version - one and a half.
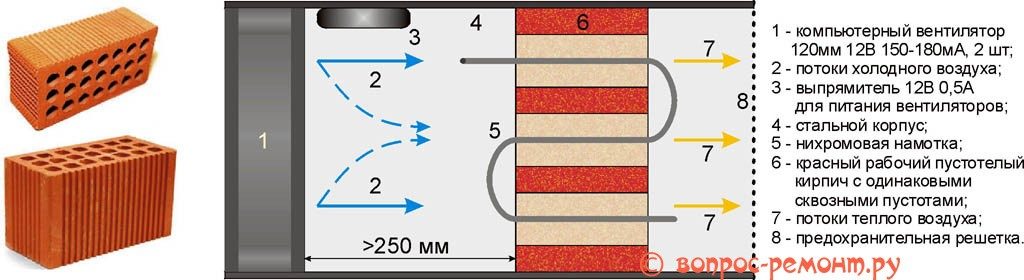
Scheme of a device for heating a garage
Nichrome spirals are used for it. Its power - 120 watts is some reserve. Current - 10 A. Resistance - 1.2 Ohms.
It should be realized by blowing spirals on one side. The location of the spirals is parallel.
Hollow brick has 24 channels (tunnels). In each of them, the spiral parameter is 0.42 A (10: 24). But this is not enough, besides thin nichrome will not work. Then the calculation is as follows:
- 12-15 A / sq. mm: 24 (material length).
- To all segments is added 20 cm to the tails (their parameter is -10 cm).
- The center transforms into a spiral. Diameter = 15-25 cm. The connection of all spirals with the help of tails is sequential.
- Strips of copper foil are used. Each width: 3 - 3.5 cm. The strip is wound in several layers onto the laid wire and twisted. The number of turns: 3-5. Here you need to work with two small pliers.
- Power is supplied by a twelve volt transformer. He has five windings from 6 to 18 watts in geometric progression (6-9-12 ...). 1.2 mm nichrome is enough for 25-30 A.
To power the fan, you will need a separate winding (12 V and 0.5 A) and a cable (cores - at least 3.5 square mm).
Wire count
Wire parameters: 1 sq. Mm (cross-section), 1.3 mm (diameter), 120 cm (length). Thickness - 0,088 m. The number of tunnels in a brick - 24.
Calculation: 0,088 x 24. It turns out 2,188
A piece of wire is threaded through holes in bricks. Can be threaded through any thread. After all, the calculation of the channels is as follows: 1.2: 0.088. It turns out 13.67. Round to 14.
Electric fireplace version
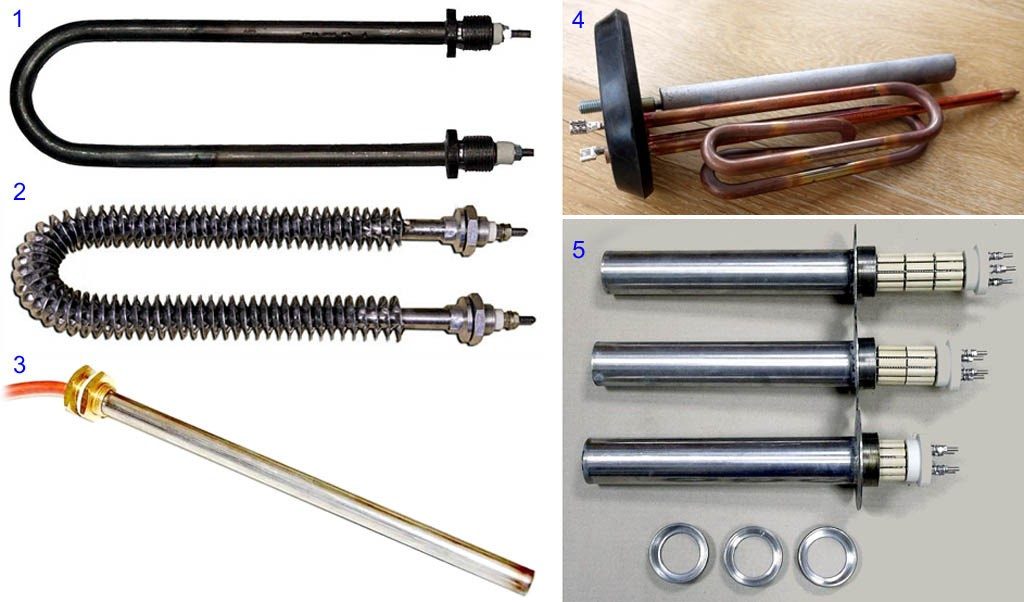
For electric fireplace devices will require the purchase of heating elements
Their types are as follows:
- Cartridge. Its body is made of stainless steel. Functions: heating, water heating.
- Copper. It has a tube for a thermal indicator and a magnesium projector. Function - water heating.
- Dry. Functions as in p1. Only the heating component in it changes without opening the tank and draining the liquid.
The heater is created on the basis of the acquired heater. Here you need an additional casing and a regular electric fireplace. The casing forms a secondary convection circuit.
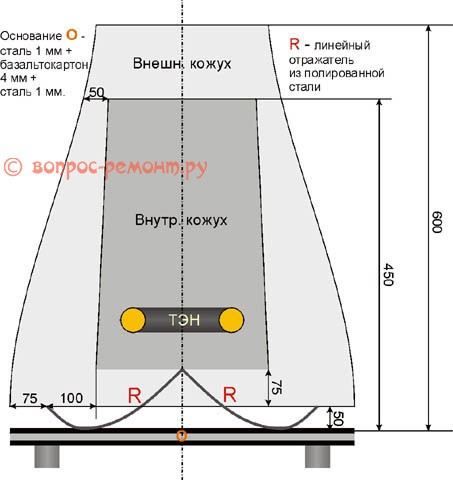
The casing forms a secondary convection circuit
The radiation goes down. Reflected into the casing. There the air warms up. Hot air is drawn in from the first casing. This increases traction. And air from such a fireplace flows widely and moderately, diverges on the sides, does not reach the ceiling. The room is heated efficiently.
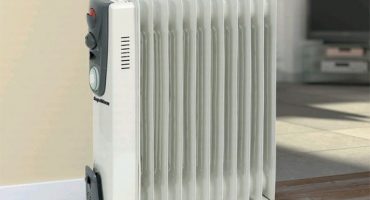
Oil version
If you decide to make an oil heater strictly with your own hands, be sure to arrange it with reliable grounding. To fill it, use only high-quality transformer oil. The development version will fit only for an empty concrete room.
To heat a large room, you need a device that has a catalytic afterburner. It is very expensive.
Different craftsmen have this question in their own way. They created a heater for the tent and camping do-it-yourself with the function of afterburning. True, this solution is not optimal for large rooms. But in the field it is optimal.
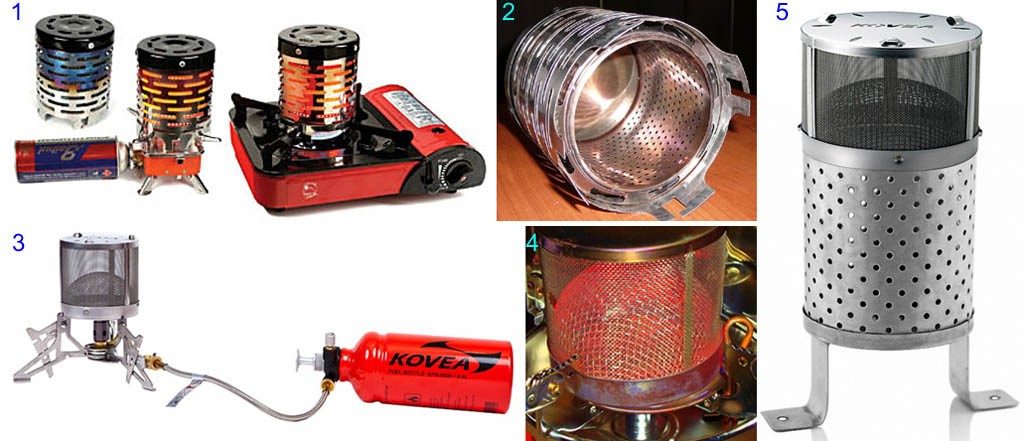
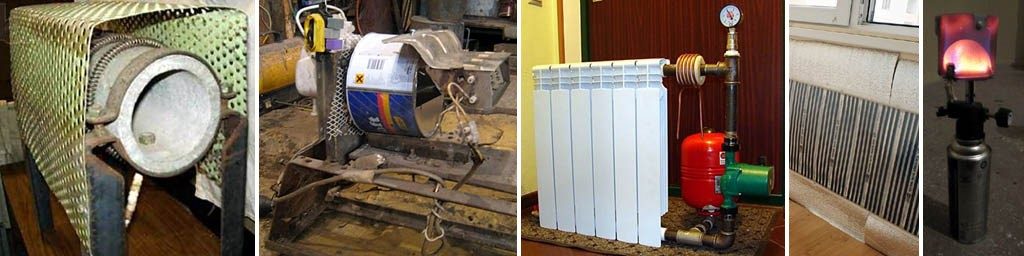
Variations of oil heating devices
This afterburner interacts with a camping primus. To create it, cans, car filters are used to make it more convenient to put in a tent. Then the operation of the device is based on gas fire.
A more advanced version of the afterburner has a grid. This is an apparatus made of steel. It has the best efficiency and economy.
It is logical to combine these versions into one. It will work both from a burner and a candle.
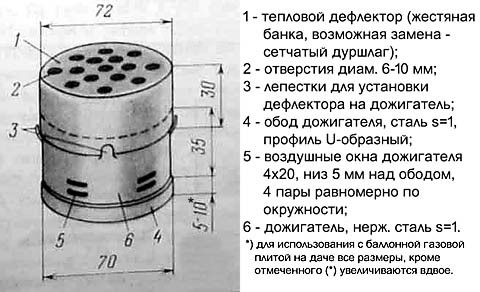
Oil circuit diagram
If the device is rarely used, it can all be made from canned cans. You just need to put the mesh cover.
Candlelight version

People heater
It is important to arrange 3 heating circuits. The essence of homemade is to make the exhaust gases burn out.
An afterburner with three circuits is assembled. Ceramic pots are used. From burnt clay comes a good radiation.
Such a heater is created for local heating, for example, for a zone near a computer. One candle gives a lot of heat. Using this unit, you need to open the window a little. And when you go to bed, extinguish the candle.