Hot water supply is one of the factors of comfort, both in a city apartment, and in a country cottage or country house. But if in the city it is enough to connect a tap in a centralized water supply system, in the country you have to solve the problem on your own.
Installing a heating boiler is an expensive procedure that is far from always cost-effective. Therefore, many owners of suburban real estate decide to make indirect heating boiler do it yourself. It perfectly solves the problem of supplying the house with hot water, but is much more economical.
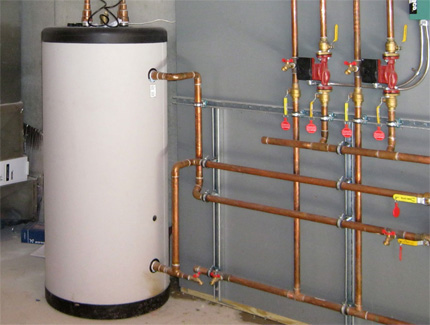
Boiler
DIY indirect heating boiler
Indirect heating boiler is a budget analogue of electric boilerwhich is independent of electricity or gas mains. The water in the boiler is heated by a spiral-shaped pipe inside the tank. Hot water flows through the coil from the heating circuit, which transfers heat to the water in the water heater through the surface of the tube of the heating element. An outlet pipe for the delivery of hot water is usually located in the upper part of the storage tank. Both tubes are equipped with ball valves, making it easy to connect the structure to the water supply and heating system. To minimize heat loss, the container is reliably wrapped with a layer of thermal insulation.
The main advantages of a self-made boiler include:
- installation of a heating system near the boiler;
- low cost of installation work;
- lack of energy consumption for heating water;
- constant maintenance of water temperature in the heater;
- the ability to connect to the central heating main.
This option has its disadvantages:
- enough space is needed to install the boiler;
- heating a large volume of cold water will take a long time;
- during heating of the tank, the efficiency of the heating circuit decreases slightly;
- plaque quickly forms on the coil inside the tank, which requires regular (once or twice a year) cleaning.
It is much easier to build a boiler with your own hands than a full-fledged water heater. It is the simplicity of the design that makes it so popular.
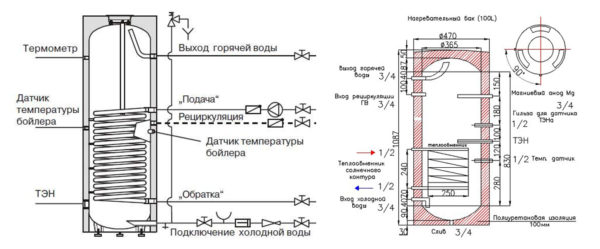
Indirect heating boiler device
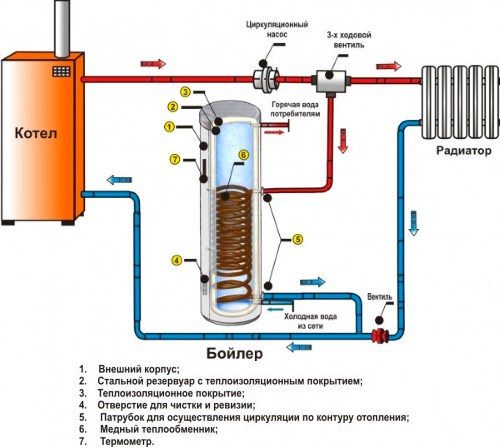
Boiler device
Indirect heating boiler is a modified heat exchanger. Typically, a heat exchanger design involves a pipe that resides in another pipe. In the case of a boiler, the coil is located inside the tank. Thus, the tank takes on the function of the outer pipe, and the coil - the inner. Hot coolant circulates through the tubular coil, coming into it from the heating circuit. Cold water is heated by contact with the surface of the hot coil.
The heater circuit is developed using counterflow technology of two media with different temperatures. The pipe through which cold water is poured into the tank is connected to the top of the tank, and the pipe that delivers hot water to the water tap is connected to the bottom. With this arrangement of pipes, the coolant is supplied to the coil through a pipe attached to the upper part of the tank.
But much more often the scheme is realized when hot water comes out through the connection with the pipe located in the upper part of the tank. In this case, the location of other pipes also changes: cold water is supplied from below (the pipe through which it is poured into the tank is mounted in its lower part), and the hot coolant is also supplied to the coil from below.
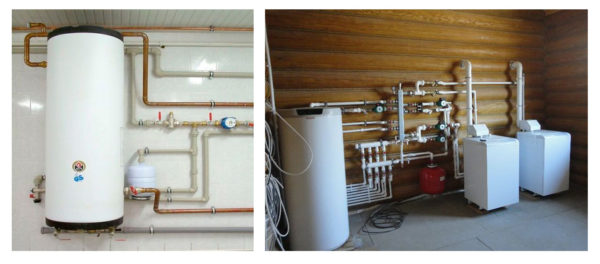
Important! It is more expedient to install the boiler as close as possible to the coolant control unit, which simplifies installation work and reduces heat loss along the liquid flow path from the heating circuit to the boiler.
If it is possible to describe the principle of operation of the device, then the following scheme is obtained:
- hot water heated in the boiler enters the coil;
- the heat transfer fluid transfers heat to the boiler and comes out in the form of chilled water;
- chilled water is redirected to the boiler for heating.
DIY design and installation
The main task facing the master, who intends to complete the installation on his own, is to select a suitable tank. It is important that the vessel covers the needs of the inhabitants of the house for hot water supply.
Since the principle of the device is quite simple, even a novice in the field of plumbing will cope with its installation. Installation work on installing a boiler with your own hands comes down to assembling its constituent elements: a tank and a tubular coil.
Storage capacity selection
Water consumption standards indicate that one person spends about 70 liters per day. A 200-liter heater will easily cover the needs of a family of three to four people in hot water supply.
Most often, homeowners choose a tank for vertical installation, but in some cases, due to the characteristics of the room or other nuances of installation, you can purchase a horizontal tank. The water heater is not hung on the wall or mounted on supports on the floor.
Choice of tank capacity
As a tank, a container of durable heat-resistant material with excellent anti-corrosion characteristics can be used. Permissible thermal expansion and other performance properties should also be taken into account. Most often, buyers prefer tanks made of aluminum, stainless steel or polymers.
Important! The boiler is filled with water under pressure, moreover, the temperature of the coolant can reach 90 ° C or more. This factor must be taken into account when selecting material for the tank and subsequent installation of the structure.
Often, amateur plumbers choose aluminum jars or pans as containers for a tank, which, of course, is unacceptable and dangerous.
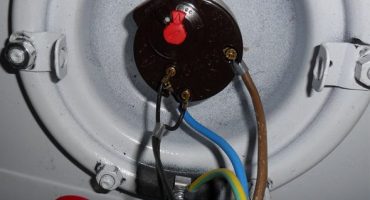
DIY boiler assembly
Five holes are drilled in the tank: two holes for the coil, two holes for supplying and discharging water, and one more for the drain cock. To use a boiler in the warm season, when the heating system is turned off, it is worth taking care of the operation of the device from the mains in advance and installing a heater. Locking elements and ball valves are attached to all openings in the tank, which will allow you to easily connect the structure to the heating circuit and water supply system.
Calculation of coil length
Work on the project involves not only the selection of capacity, but also the calculation of the coil. It will be necessary to calculate its thermal power to determine the length of the pipe and its diameter.
Most often, the coil is made of brass or copper, because these materials perfectly transmit heat. Also suitable as a material plastic. To calculate the necessary parameters, use the following formula:
L = Q / D * (Tmountains - Tthe hall.) * 3.14, where:
- the letter L indicates the length of the tube;
- the letter Q denotes the thermal power of the tubular coil;
- D is the diameter of the pipe from which the coil will be made;
- Tmountains - the temperature of the mountains. water;
- Tthe hall. - temperature hall. water.
For example, below is the calculation of the length of a copper pipe for the manufacture of a coil with a power of 20 kW.The tank capacity is 200 liters, the tube diameter is 10 mm. The temperature of cold water is 15 ° C, hot - 80 ° C. It is necessary to calculate the size of the pipe, which will be sufficient for the manufacture of a heat transfer coil having a power of 20 kW:
20/0,01*(80-15)*3,14.
As a result of the calculations, it becomes clear that the required pipe length is 10 meters.
The manufacture of the coil and its processing
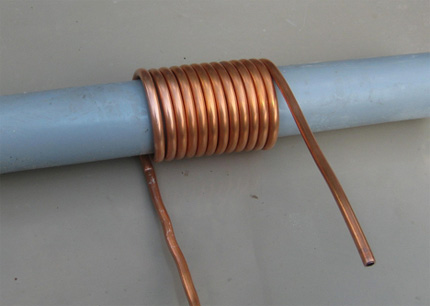
Boiler coil
The copper tube serves as the material for the manufacture of the coil. It is twisted in a spiral, making a gap of 5-7 mm between adjacent turns. A gap is necessary to compensate for the expansion of metal elements during heating during operation of the boiler. You can take it into account immediately, or push the turns after winding. Another reason for the need for a gap is because the water in the tank contacts a larger surface area of the coil, and the boiler's work becomes more efficient.
The coil can be made from a tube yourself, or you can take a finished tube from other equipment for these purposes. In this case, the dimensions of the borrowed pipe and the selected tank should be compared: they must fit together so that the heat exchanger works as efficiently as possible.
In practice, it’s quite difficult to find a coil that fits perfectly with the tank, so it’s easier to do it yourself. It can be quite difficult for a beginner, but with due diligence it will work out. The main thing is to perform the winding of the spiral very high quality. To wind the pipe, you will need a drum whose diameter is approximately 10-15% less than the inner diameter of the tank. As a drum, you can use a log of the desired diameter. For example, if the diameter of the tank is 50 cm, the diameter of the coil will be 45 cm.
To perform the winding correctly, you need:
- perform turns at a short distance from each other: so the heated water can contact the entire surface of the tube and heat up faster;
- do not be zealous in the process, otherwise there is a risk that it will be necessary to remove the winding from the drum with great efforts;
- the number of coil turns is calculated based on the volume and height of the boiler capacity.
At both ends of the spiral tube, threaded fittings are installed. This operation consists of several simple steps:
- Processing the ends of the pipes with a pipe cutter to obtain an even cut.
- Installing crimp nuts on the end of the pipe.
- Scanning the edge.
- Installation of fittings and tightening them with nuts.
If the person who installs the boiler has soldering skills, then bilateral fittings can be replaced with single-sided threaded fittings by soldering them to the ends of the pipe. Or, if it allows the material of the tank body, you can solder the pipe directly to the body. But professionals do not recommend beginners to choose this option because of the technical difficulties of its implementation.
After the coil has received the desired shape and was equipped with fittings on both sides, you can install it directly in the boiler.
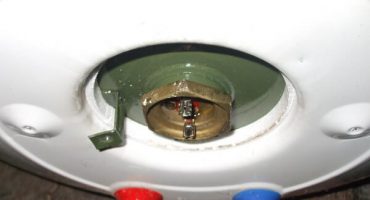
Boiler capacity preparation
If the container used as a tank is solid, then it will have to be cut to install the coil inside. For this purpose, the upper part is cut off and a lid is made, which is then closed with bolts. The joints between the lid and the tank are carefully leveled and ground. To prevent leaks, use a rubber gasket.

Preparing the tank for the boiler
In order to place a coil in the tank, one cover is enough. But since the structure during operation will need periodic maintenance, it is more advisable to make two covers: one on top and one on the bottom. So it will be easier to clean the coil from deposits.
When the cover is ready, it remains to drill holes for the coil tubes and place it inside the structure. The holes are cut to the same diameter as the threads of the fittings that will be inserted into them, leaving a gap of a couple of millimeters for laying.
After the holes are drilled and the fittings are inserted into them and sealed with a gasket, counter fittings are wound on the outside of the tank and tighten the connection.
This mounting method reliably fixes the spiral inside the tank, but additional support elements should be provided for reliability. Since the movement of hot water through the pipe occurs under pressure, vibrations often occur as a result. Additional fixation of the coil will definitely not be superfluous.
Holes are drilled through the tank through which cold water will enter and hot water will exit. On the branch pipes extending from these holes, shut-off valves are installed.
Thermal insulation
To reduce heat loss to a minimum and increase the efficiency of the boiler, it is necessary to perform its thermal insulation. For this purpose, use foam, mineral wool, or simply place the tank inside a larger tank, and the free space between their walls is laid with foam or other insulating material. Outside, the tank capacity is closed with sheets of metal or foil insulation to give it a neat appearance.
Instructions for connecting and starting the system
When preparing a boiler for operation, it is first of all connected to the heating system. It can be a network of a home autonomous boiler or a central highway. During the connection, the tank lid must be open. When all the pipes are interconnected in the correct order, the shut-off valve of the return pipe is opened to make sure that there are no leaks at the joints and the pipes themselves.
If no leaks are found, you can open the coolant supply valve to the coil. After the spiral warms up to normal temperature, the structure is again inspected for leaks.
If everything is in order, the lid of the tank is closed and water is drawn into it, and the tap for supplying hot water to the water supply is also opened. Now you can evaluate the quality of heating.
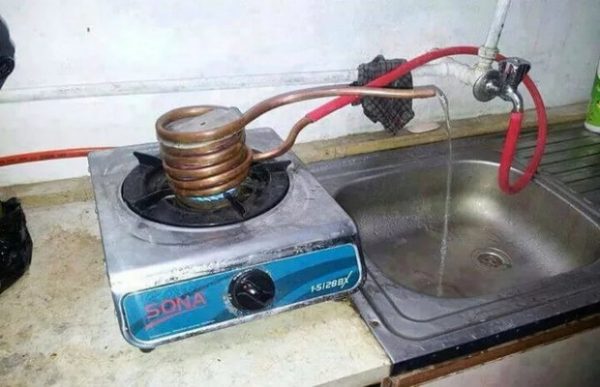
Electric water boiler: how to make a gas cylinder heater yourself
Boiler circuit
If in winter the indirect heating boiler warms up due to the heating system, then for the summer period it is advisable to equip it with a heating element. One or two gas cylinders, which can be found at home, can serve as a tank for a boiler. Both a new cylinder and a used one will do.
You can use one cylinder, but since its capacity is small (usually 50 liters), it is more expedient to take two cylinders at once and weld them together, cutting off the bottom of both containers. The walls of the tanks are made of stainless steel, which is great for long-term interaction with hot water.
Tools and materials
To assemble the boiler, you will need:
- the cylinder itself or two, if you plan to make a large volume heater;
- Bulgarian;
- angle grinder for surface cleaning;
- coil (independently made of a copper or brass pipe), or a pipe;
- nitro-primer paint;
- electric drill with crown nozzle;
- fittings and ball valves for connecting the structure to the pipeline;
- a pipe bender for forming coils, or a log, a pipe of a suitable size (if the design involves the use of a coil, and not a straight pipe);
- dense polyethylene or fabric, as well as sprayed polyurethane for thermal insulation;
- mounts for suspension or support.
When all materials are ready, you can begin to manufacture.
Manufacturing instruction
Preparation consists of the following steps:
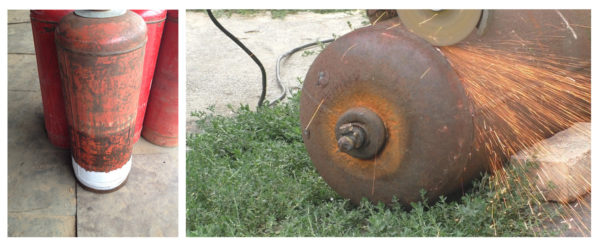
Gas cylinder for boiler
- First, a gas cylinder is prepared. It must be thoroughly cleaned and sawed with a grinder.
- Then the inner surface is cleaned using an angle grinder, washed, dried and coated with nitro-primer paint to avoid the smell of gas from water during operation.
Then proceed to the assembly of the water heater.
Assembly
Assembly is carried out in the following sequence:
- In the cylinder, electric holes are drilled for cold water inlet and hot water outlet. A hole is also made for the coil or pipe.
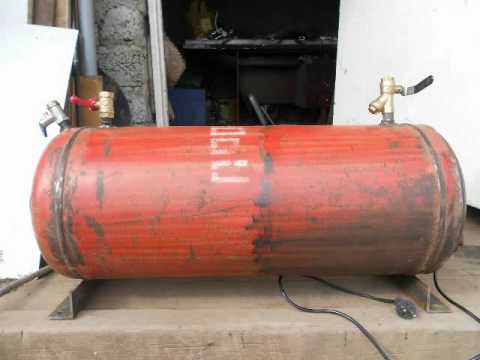
Assembling a gas cylinder boiler
- The holes are cleaned and fittings and ball valves are installed in them.
- In the lower part of the tank, another hole is drilled through which stagnant water will merge.
- Using a pipe bender, a coil is made from a copper pipe with a diameter of 10 mm. It is worth making according to previously performed calculations. The ends of the coil are bent in one direction at a distance of 20-30 cm.
- Threaded fittings are welded into the holes sawn under the coil.
Important! Before mounting the coil inside the tank, it is lowered into the water and purged to eliminate the possibility of leaks.
- The coil is inserted into the holes drilled for it and welded.
- When cutting the cylinder in the middle, in the lower part they mount the heater, drilling a hole under it and screwing the threaded nozzle. If the design of the tank involves a separate bottom, cover and central part, an electric heater can be installed at the end of the assembly.
- Outside, the tank is insulated with heat-insulating material. All nozzles are protected with polyethylene and fabric, and then sprayed polyurethane is applied. If you want to save. You can use polyurethane foam wrapped in foil body insulation.
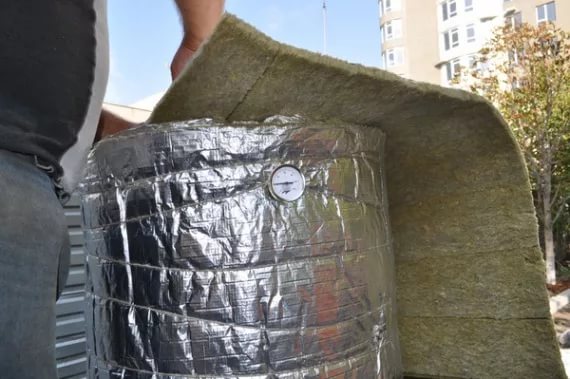
Thermal insulation for a boiler
- Fasteners are welded to the boiler and place it in the selected place.
At the end of the work, screw fittings, cranes, and mount the top cover. It is better not to weld it, but to fix it on bolts or steel wire in order to have access to the inside of the tank.
The variants of improvised indirect heating boilers described in the text are just some of the possible ones. Along with cylindrical boilers, amateur plumbers also assemble designs based on square containers, make a multilayer winding instead of a single layer. The main thing is to correctly calculate the design so that the tank has a sufficient volume, and the coil provides the desired level of heating.