It is no secret that in our country, which supplies gas to all of Europe and not only, many settlements are still not connected to gas pipelines. Therefore, the purchase of an electric water heater for a private home is a deliberate necessity. Fortunately, there is no shortage of offers, and you can choose a well-known brand boiler in the trading network of any region. The choice is limited only by the purchasing power of a person.
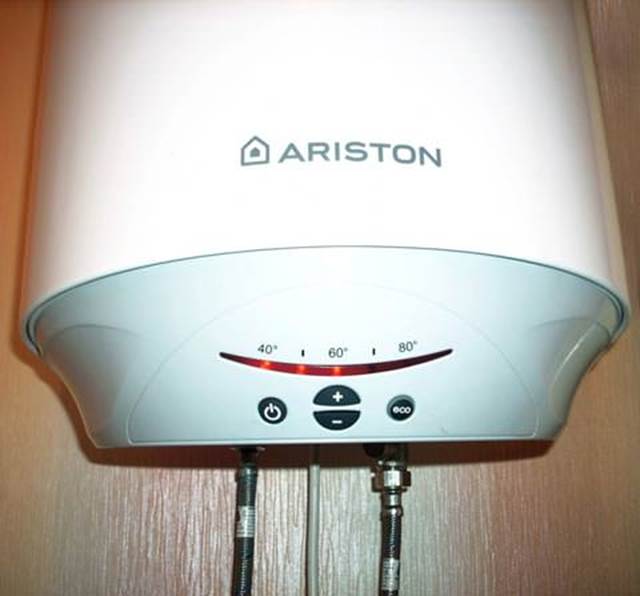
Boilers manufactured by Ariston, Termex and Gorenje have long gained popularity in Russia as unpretentious, simple to use and reasonably priced devices. But for reliable and durable operation of any device, careful care and attention is required.
Get to know your boiler device
To understand how to ensure long-term uninterrupted operation of the purchased unit, you need to at least present its device in draft form. It will not be superfluous to read the instructions for this model. This will allow you not to make mistakes when using an electric water heater.
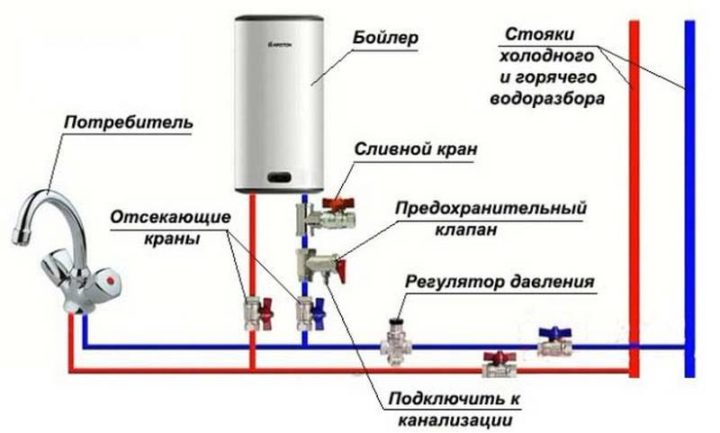
The scheme suitable for most of the manufactured water heating devices is presented in the picture below:
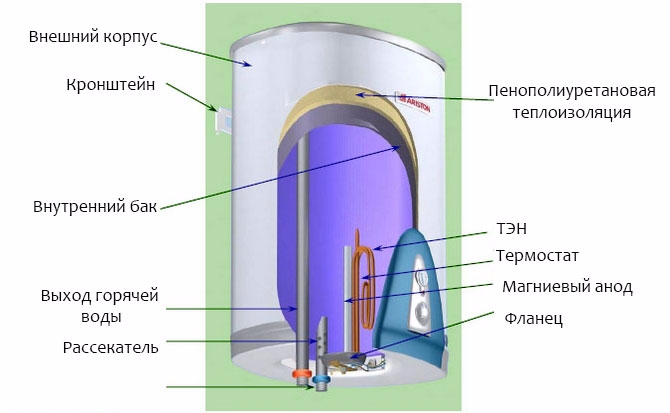
Schematic arrangement of a storage water heater
In any water there is a certain amount of dissolved salts and minerals. With frequent heating and cooling, these salts crystallize and settle on the inner walls of the tank in its lower part. For 2-3 years, not only the walls are covered with a strong shell, but also a heating element and a copper tube, inside which a temperature sensor is inserted. To reduce the rigidity of the formed slag and to prevent corrosion of the tank body, a magnesium anode is mounted on the same flange with a heating element. But it is not designed for long work, so it needs to be changed from time to time.
If you take apart a boiler that has worked without cleaning for several years, you can see the following picture:
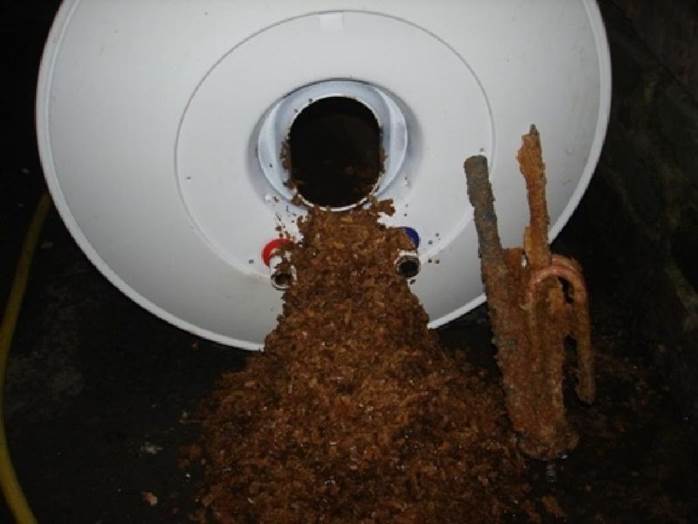
Limescale resulting from prolonged use of the Ariston boiler
This situation is not only terrible for its appearance. Such a frivolous attitude towards the water heater can lead to the following consequences:
- With such a quantity of scale, energy consumption increases when heating water.
- Due to the higher temperature in the zone of operation of the heating element, the temperature sensor or heating element fails.
- It completely fails and, naturally, requires a replacement of the magnesium anode.
- The risk of corrosion of the tank body increases many times, which will result in water leakage. In this case, the replacement of the device with a new one is inevitable.
In order not to take matters to such an extreme, almost all companies that produce electric water heaters recommend the prevention of devices once every one to two years. What does it consist of? It is necessary to disassemble the water heater, replace the magnesium anode with a new one, check and, if necessary, clean the heating element, clean and rinse the inside of the tank with water. If you hold this kind of event all the time, the life of the boiler can increase at least twice.
Important! Each boiler model has its own type of heating element. Therefore, at the first preventive cleaning of the tank, it is worth buying not only the anode, but also the heater.It will not be superfluous to purchase a new rubber gasket for this model.
Water heater disassembly process - step by step instructions
For preventive cleaning of the boiler or for replacing a burned-out heating element, several steps must be performed in sequence:
- completely disconnect the device;
- dismantle the electronic filling under the protective cover;
- drain the water from the heating tank;
- unscrew and remove the flange on which the heater and the magnesium anode are mounted;
- clean the tank and heating element from scale and slag, replace the old anode with a new one;
- assemble the boiler by repeating the steps in the reverse order;
- pour water and test the performance by experience.
And now we will consider how to properly disassemble a boiler, using the example of an Ariston company product of an inexpensive segment. The choice of this type of heater is due to a minimum of actions, a simple device for mounting and control electronics. That will allow to do on their own, without attracting highly paid specialists to the repair.
Switch off the device completely.
This action does not particularly need explanation. Any electrical device before incomplete or complete disassembly is disconnected from the network. To de-energize the heating boiler, just disconnect the power cord from the mains. Or turn off the machines, if the unit is connected to power through them.
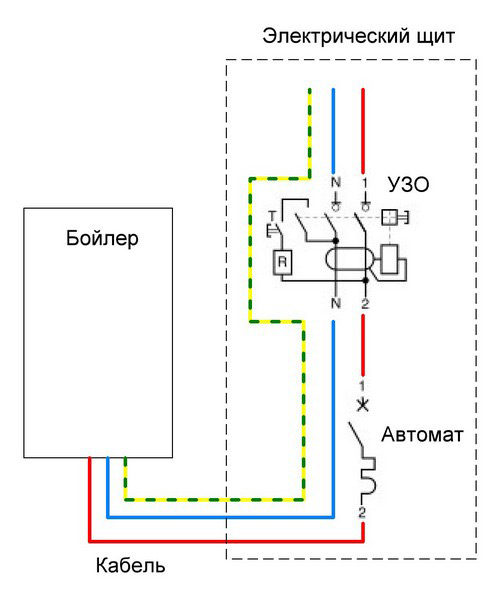
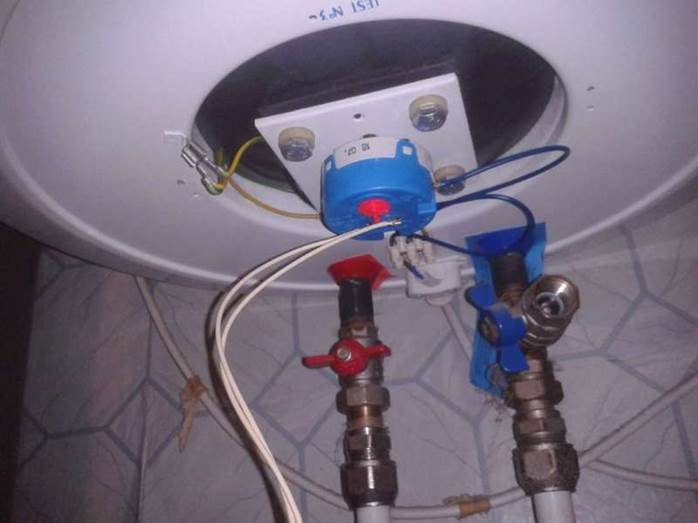
Scheme of connecting a water heater to an electric circuit
Dismantle the electronic filling under the protective cover.
For this operation you will need a Phillips and flat head screwdriver. First, unscrew the screws holding the plastic cover and remove it.
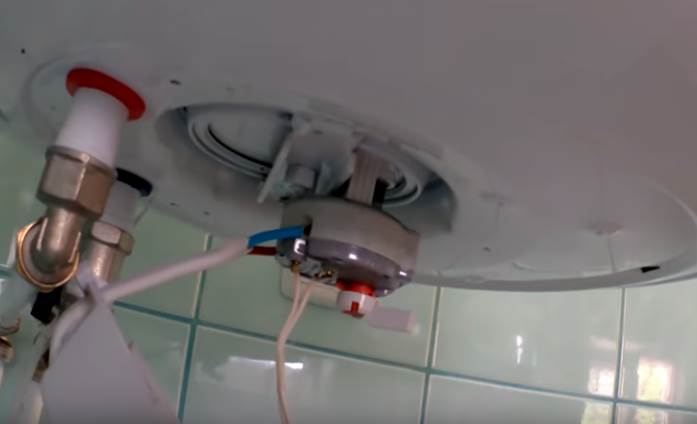
View with cover removed
Then disconnect the wires from the temperature controller, not forgetting the ground wire, which is attached to the housing with a bolt. Now you can pull the thermostat out of the tank and set it aside so as not to accidentally damage or splash water.
How to drain water from a heating tank
This step depends on how you connect the water to your boiler. If the master did the connection, he mounted a faucet with a fitting to drain the water from the tank.
Scheme of normal connection of water to the boiler
We block the supply of cold water to the boiler. It remains to connect one end of the hose to the fitting, and lower the other into a bath or any other drain with access to the sewer. Then open the faucet hot water tap in the bathroom or in the kitchen (so that the pressure in the tank is equal to atmospheric) and open the drain tap. Draining the water takes some time and depends mainly on the volume of the tank. Do not forget that after draining some of its water will remain in the water heater.
In the absence of a drain cock, part of the water is removed using a check valve. If it is constantly connected to the sewer, it is enough to bend the plastic valve up and then open the hot water tap. But this is a very lengthy process, since the diameter of the hole in the valve is small.
If the water is connected to the boiler as shown in the photo below, you will have to arrange a small flood.
The simplest water supply to the boiler
For the flood to be manageable, it is necessary to substitute a plastic container under the water heater, for example, a large basin. Then we turn out the safety valve from the case. We open the hot tap of the mixer in the bathroom (it is not advisable to unscrew the hot water supply hose immediately). Water will begin to fill the basin. You can pick up a rubber hose under the hole in the tank. Then, dropping one end into the drain of the sewer, you will only need to control that the water does not fall on the floor. And, accordingly, wait until the water stops draining from the hose.
There is another option. It is necessary to wait until the basin is filled with water, turn off the hot water tap of the mixer. Then use your finger to close the hole through which the water drains. Here you need an assistant who will drain the water from the basin. Then the procedure is repeated until the tank is completely empty.All these actions seem complicated only at first glance.
After the water drains almost completely from the tank, you can unscrew the hot water supply hose.
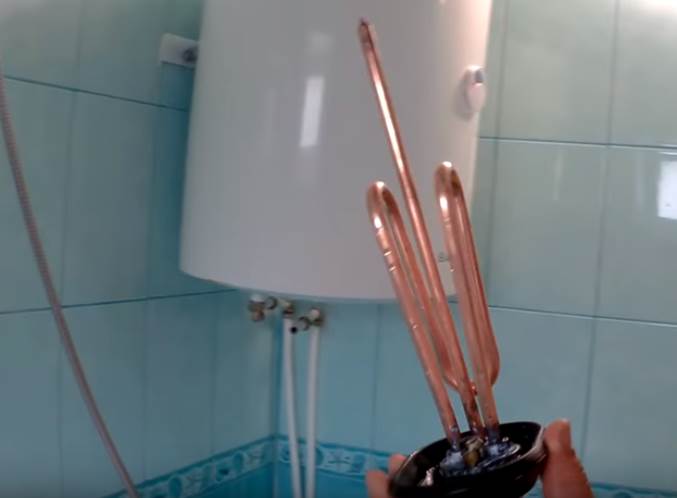
We take out the flange on which the heater and the magnesium anode are mounted
The plate with a heating element in most Ariston models is oval. It is attached with a special bracket to one nut, while in models of other manufacturers of water heaters, tightness is provided by 4 to 6 nuts.
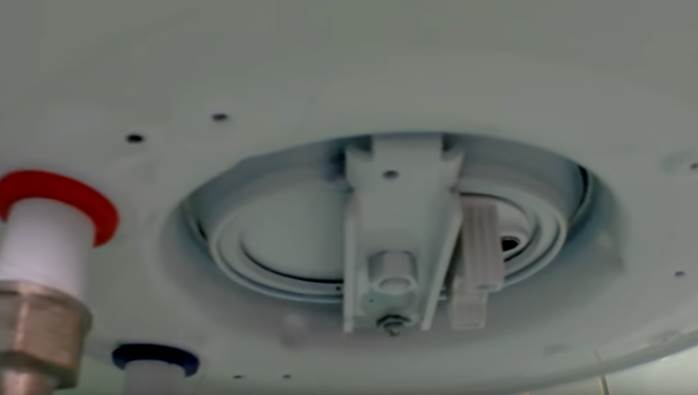
This is how the flange and mounting bracket look in the Ariston boiler
Dismantling the flange is quite simple. We substitute a water tank under the body. Unscrew the nut with a wrench. Remove the bracket. Then we gently tap the flange with the wooden handle of the hammer until the leak is broken and it goes into the case. Let the remaining water drain.
We put our hand into the hole and pull out the flange, turning it in the horizontal and vertical plane, as in the photo below:
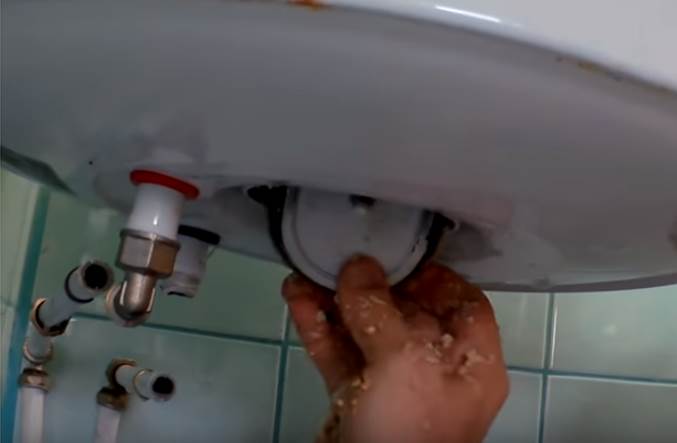
Flange removal
The heater in such water heaters is usually curved, so you need to pull out the flange carefully. After the plate is released from captivity, proceed directly to cleaning.
The next stage is the cleaning of the tank and heating element from scale and slag.
If the boiler hangs low and its cleaning is difficult, it would be logical to remove it from the wall and put it in the bathroom. It is recommended to close the drain in the bath with a stopper so that the slag from the tank does not enter the sewer. Otherwise, the savings on self-analysis of the device will come to naught - you will have to call the plumbing.
The best option is if you can take the case out onto the street and hang it horizontally. Then you need to stick your hand inside and scoop up the accumulated toxins. Then flush the inside with plenty of water from the hose. If preventive cleaning is done every one and a half to two years, then there is no need to treat the inside of the tank with liquids to dissolve deposits.
Important! Never use metal brushes, sandpaper, or other similar devices to clean the inside of the case. This can damage the anti-corrosion words of the water heater!
While the case is dry, turn our eyes to the flange. First of all, remove the rubber gasket, carefully rinse it with your fingers under running water. We inspect for gusts and cracks and, in their absence, set aside to dry. Then we unscrew what remains of the magnesium anode. It is mounted on a thread in the flange and should twist easily.
The heater on the plate is cleaned from the scum of the hands, washed under a stream of water. If the scale still remains on the copper tubes, we lower the heating element into the descaling liquid - the trading network offers several types of such liquid from different manufacturers. You can do even easier: dissolve 6-8 teaspoons of citric acid in 1.5 liters of water. Cut off the top of a 1.5 liter plastic bottle, pour the resulting solution into it and lower the heater. Usually the result can be observed after a minute - the water will slightly “boil”. The entire cleaning process will take several hours.
Important! While the boiler is disassembled, it is worth purchasing the exact same new anode and heating element in the appropriate store. As you know - a stock pocket does not pull.
TEN after "bathing" in a solution of citric acid
It is better to replace the magnesium anode with a new one. But if his condition looks good on you, leave the old one until the next preventative cleaning.
We assemble the boiler, repeating the steps in reverse
Due to the simplicity of the design, assembly of the unit should not cause difficulties:
- we put a rubber gasket on the flange;
- carefully insert it into the boiler;
- make sure that the flange fits tightly and evenly in the oval hole;
- put the U-shaped bracket in place and tighten with a nut until it stops;
- we connect water supply hoses with all the necessary taps and valves;
- we fill the boiler with water at least half to check for leaks;
- we insert a temperature sensor with a heating controller into our socket;
- we connect electric wires, not forgetting about grounding;
- We connect the boiler to the mains, fill the tank with water completely and make a test heating of the water.
The water heater is ready for further work!
Features and differences in the disassembly of water heaters Ariston, Thermex and Gorenje
Each company, producing products of the same nature, tries to give its products the characteristic features that distinguish their products from other manufacturers. Boilers from Ariston, Termex and Gorenje also have their own design features and differences. So, the insulation layer between the inner tank and the casing of the Gorenje models is made of expanded polystyrene, while other companies have polyurethane foam insulation.
Another distinctive feature will be the shape and methods of fastening the flange. For example, in Ariston's models, this is an oval part, which is fastened with a bracket and one nut. Other manufacturers have made this base plate either round or square.
Boiler device
4 or even 6 nuts provide tightness here. In addition, the magnesium anode of Gorenje is mounted not on the flange, but on top of the tank. A controversial decision requiring additional effort, ingenuity and tools when replacing it.
There are many differences in the electronic content. Therefore, during the first disassembly, you need to take a picture of all the wire connections to the phone so that you can not make a mistake during assembly. In the event of an error, it is likely that the electronics will burn out.
Of the companies examined, only Gorenje boilers are assembled in Europe, two other manufacturers have assembly shops in Russia. But the quality of products for each company is quite high, and corresponds to the cost of products.
Whatever differences are applied in the above models of water heaters of different companies, all this equipment copes quite well with its functions - to provide consumers with hot water. And with proper care, it can last much longer than the manufacturer's life expectancy.