At home, independently, craftsmen manage to modernize the equipment, not only adapting it to the household, but also creating full-fledged devices needed in agricultural activities. There are many examples: engine from the washing machine becomes a lathe, a home mechanical meat grinder is transformed into an electric one, etc. A home-made granulator made with your own hands from a meat grinder allows you to mix several types of herbs for feeding animals, create an exclusive compound feed.
The process of creating granules
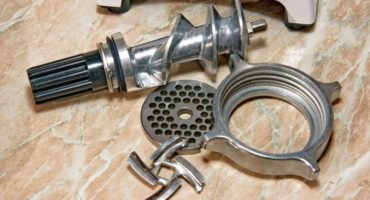
As for the meat grinder, it turns out to make whole masterpieces, for example, a granulator. We’ll make a reservation right away - the device will not be able to granulate solids, there are not enough loads, however, the device is very suitable for animal feed: the rod and engine can stand without problems.
Why do you need a granulator? Types of granulators
Pelletizer is also called a granulator. The main objective of the device is to granulate materials that have previously undergone thorough grinding. The granulator can be indispensable in agriculture, significantly increasing the productivity of agglomeration mechanisms. They are also used to create pellets of fuel, the so-called pellets.
Assembly preparations
Materials can be completely different - waste from the woodworking industry, fish or horse feed, etc. What would not fall asleep in the granulator, its main task: to turn potential waste into useful and necessary material.
The Internet provides a variety of information regarding how to make a granulator with your own hands; In this article we will present the most effective way. The performance of the proposed granulator, in many cases, is higher than that of devices on sale.
Granulators have two areas of application:
- granulation of finely divided concentrate;
- increasing the strength of the pellet formed after the procedure.
Granulation is necessary when bulk materials need to be given denser, cylindrical shapes (granules).
What will be needed for work
In order to make a granulator from a meat grinder, we need:
- verstat - the basis of design, a durable table is suitable;
- a meat grinder, the mechanism of which will become the basis of the granulator;
- a lathe (you can make it yourself);
- drilling machine;
- disc, which is necessary to create a matrix, the thickness of the disc should be about 60 mm .;
- an electric motor (from a washing machine or vacuum cleaner is quite suitable; a voltage of 220 V is more convenient, but 380 is more favorable);
- a belt for creating an engine-meat-grinder drive; no need to take a toothed belt, better let it slip;
- pulleys (2 pcs.) with a ratio of 1: 2 - the principle of reduction is the basis, we will need to reduce the gear ratio to increase power and lower revs.
Step-by-step instructions for assembling a homemade granulator
We should outline the future installation in order to understand what our device should look like.
The scheme of movement of the roller and rollers
The drawings must accurately indicate which component and where it is located, which engine we will use, how it will be located, how the oil press will be made and what is needed for this. We carry out the drawings on the largest possible scale to avoid inconsistencies in the assembly process.
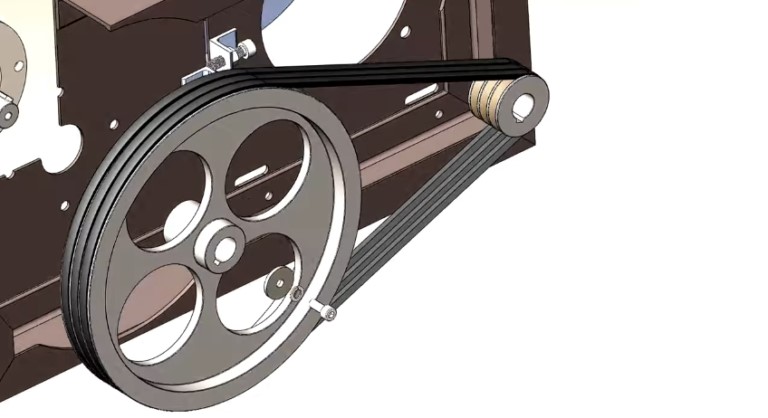
Belting
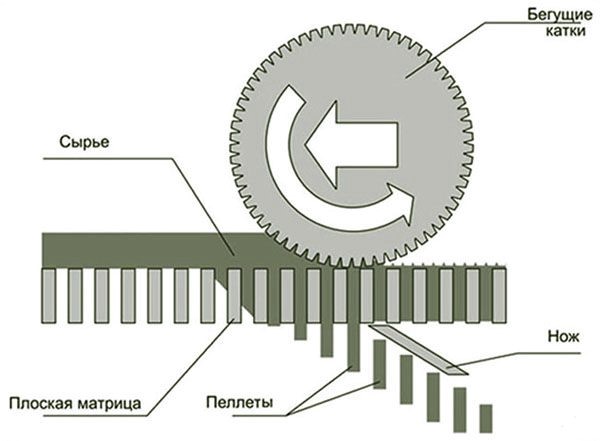
Do not forget that the meat grinder should contain dies, covers, knives. When making a matrix, it should be remembered that it should fit the worm as tightly as possible: part of the matrix should be drowned.
Assembly of the device should be started in the place where it will be installed in the future. The future press should be fixed to the bed (solid table). Everything should be installed as firmly as possible, which means it should be bolted.
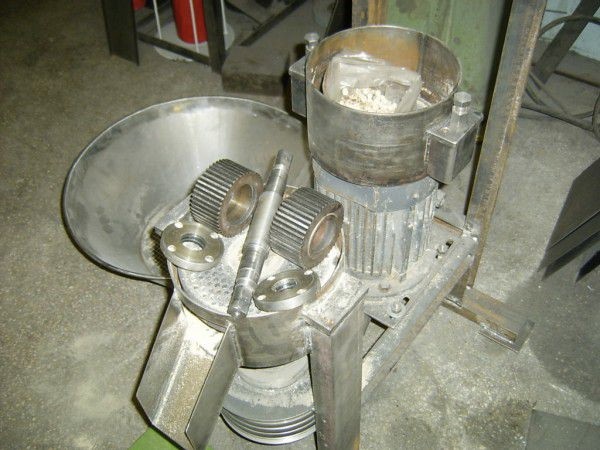
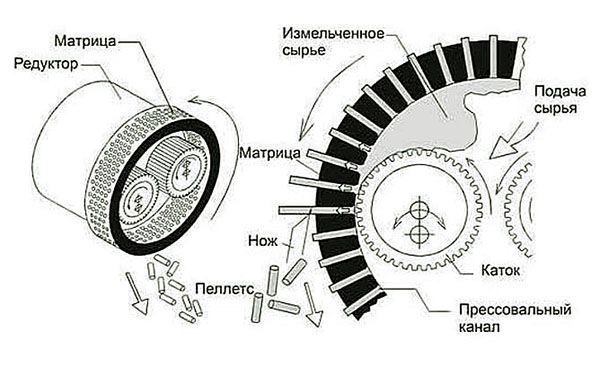
The granulator in its design contains the following components:
- housing;
- frame;
- motor;
- gearbox, main shaft;
- flat type matrix and cylindrical rollers.
To prepare the components, sheets of steel and tin, metal corners, thick (sometimes cast) metal sheets, gear rollers (rollers, which are necessary if the design is based on a screw type granulator) will be required.
The structure of the roller mechanism
You will also need a welding machine. You can order welding on the side, but you can never foresee for sure where exactly you will need an additional welding seam.
Assembly actions will be in the following order.
- Frame preparation. Remember that serious vibrations and impressive loads will act on the frame during operation. At the heart of the frame, it is best to use metal corners that can be arc welded. It is reasonable to make the bed of the granulator out of steel. The use of sheets of 250x400 mm is allowed. A grinder can cut the sheet into the necessary parts, after which, by welding, assemble them into a finished frame.
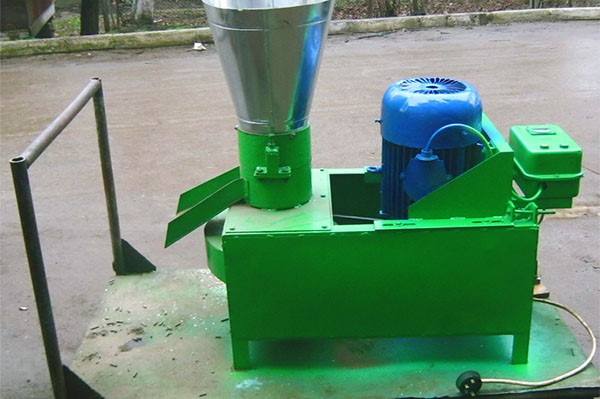
Homemade granulator in a makeshift housing
- After the frame is prepared, the working components of the device should be fixed on it: gearbox, matrix and gears. The matrix should be made independently. Either a solid sheet of metal (8mm) or separate metal profiles is used. If there is no desire to make a matrix, you can use it ready, they are presented in agricultural stores.
- A lot of holes should be made along the perimeter of the sheet of metal, each 1 cm thick. It is easy to understand that the width (diameter) of each hole should correspond to the size of the future granule. The holes should have the form of a cone, this allows the production of granules smoothly (the compression process proceeds gradually). The resulting granules will be of high quality.
- The flat matrix should contain an additional hole with a groove; it should be designed as matrix fasteners to the shaft. The gearbox should be installed at the bottom of the device. It must be installed using the appropriate keys.
- The finished flat matrix must be installed inside the granulator (directly on the installation shaft). The main shell should be made from a tin pipe. It should be remembered that a gap (backlash) should be left between the walls of the hollow space of the pipe and the matrix. The matrix can be mounted both on the basis of a movable type and a stationary one.
- The granulator body and gearbox must be bolted together. Very often, such contacts turn out to be excessively weak, so that the connection is very reliable, you should weld the ears on both sides and drill holes for them in the fasteners.
- Above, above the matrix, perpendicular to the shaft (and correspondingly the gearbox), a set of cylindrical rollers should be installed.
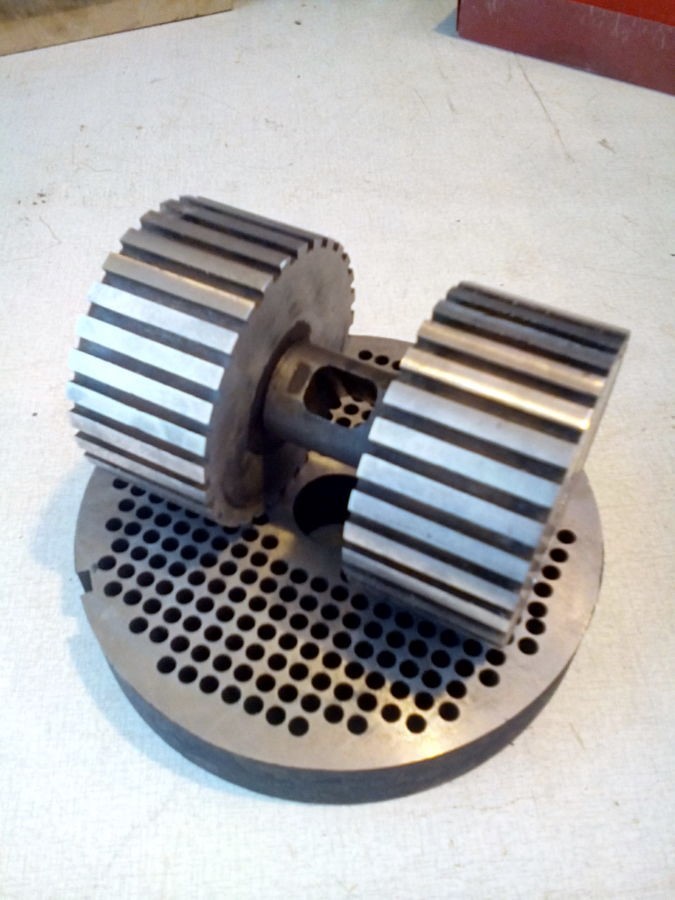
Roller (roller) and matrix
- When the main structure can be considered complete, the motor should be fixed. Engine performance should not be lower than 25 kilowatts. If you do not want to buy a new engine, you should use vacuum cleaner motor. It can be connected to a gearbox that rotates the shaft. The engine speed during the transition to the shaft is significantly reduced, and the torque, on the contrary, is increased.
9. In order for the granulator to be convenient in operation, a special vessel for collecting granules can be fixed to it (by welding).