Thermal sweat - This is a small household appliance that combines the properties of two devices at once - an electric kettle and a thermos.
The main advantage is the ability to boil water and maintain its temperature in a predetermined mode, as well as the ability to repair a thermal sweat with your own hands in case of need.
How it works
Note that, despite the presence of a host of advantages, the thermal sweat has specific disadvantages, in particular:
- high cost - much more than a standard electric kettle;
- low boiling speed (compared to electric kettles);
- increased energy costs due to the constant inclusion and the need to work in the mode of maintaining the temperature.
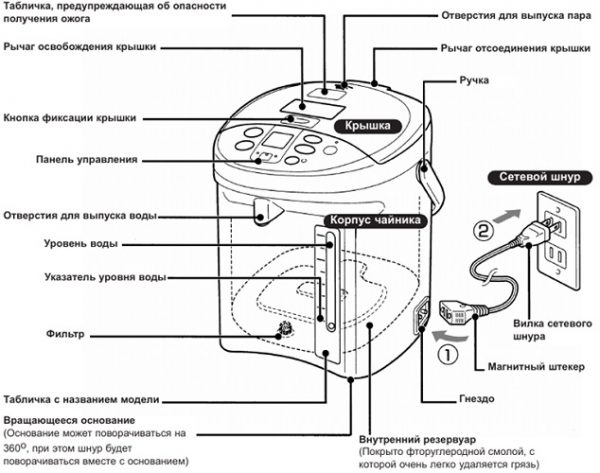
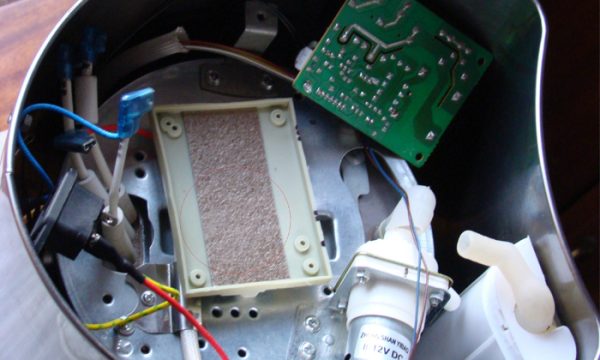
The device consists of a housing, external elements of the control panel and internal technical devices.
The case is made of various materials (depending on the model of the unit):
- glass;
- plastic;
- metal;
- ceramics.
A combination of these materials is also possible.

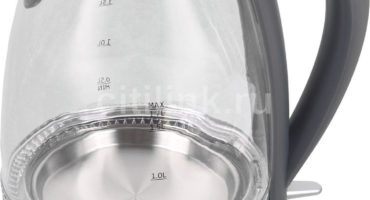
The appearance of the thermal sweat
The shape of the case also depends on the specific model. Often, it is either a half cylinder or a rectangle.
For the convenience of maintenance and care, almost all models are equipped with a removable flask into which water is poured.
Also, the device is equipped with a control panel with buttons that allow you to set certain operating modes.
Since the unit in question combines two traditional devices at once - a kettle and a thermos - two ten are immediately inside:
- one is directly responsible for bringing the water to a boiling state;
- the second performs the function of maintaining the temperature at a given level.
Due to the fact that the thermal sweat is quite heavy and dimensional, manufacturers provide it with a special button for supplying water. This is very convenient - just substitute a mug under the drain hole and press the drain button. A special water pump, a pump, is responsible for pumping water.
All thermal sweets are also equipped with electronic filling - namely, a control chip that processes user commands and a power supply.
Main nodes
Basic principles of operation
The device operates in the following order:
- water is poured;
- the top cover closes;
- a heating element used to boil water, heats the water to a temperature of 100 degrees;
- as soon as the water reaches the above temperature, a thermal fuse that protects against overheating turns off the device;
- water starts to cool down to the temperature set by the user;
- a “second element” is included in the “case”, designed to maintain a given temperature regime.
Circuit diagram
If thermal sweat does not work, you need to familiarize yourself with the circuit diagram.
The circuit of this device is not too complicated - not even a professional electrician can “read” it.
It can be used to investigate the causes of damage to devices from such popular manufacturers as:
- Polaris
- Vitek;
- Elenberg;
- Scarlett et al.
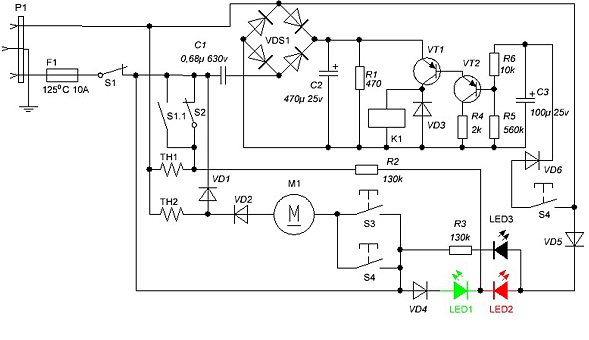
Circuit diagram
Explanation of the main symbols used in the diagram
Decoding:
- S1 and S2 are temperature switches from the KSD 302 series, the first is located in the middle of the stainless steel tank and is connected in series to transmit a supply voltage of 220 Volts, the second is located in the bottom of the thermal stream - current flows to the main heating element through it;
- F1 - thermal fuse;
- TH2 is an additional water heating coil that should be checked to answer the question of why the thermal sweat does not hold temperature;
- Relay S1.1, connected in parallel to the boiling coil;
- TH1 - the spiral of the main ten;
- VT1, VT2 - transistors on which the on / off time control relay is located, opening under the action of a charged capacitor C3;
- C3 is an electrolytic capacitor that is charged by pulses from VD6 by briefly pressing the button S4;
- K1 - relay coil through which electric current flows and switches S1.1;
- C1, C2, VDS1 - voltage rectifiers that supply power to the time relay circuit.
Notes:
- C1 serves as a surge absorber;
- C2 - smooths out ripples of electric current formed as a result of the operation of the bridge rectifier VDS1;
- some units do not use C1, but a step-down transformer.
Private malfunctions
Like any other household appliance item, the thermal sweat has a list of the most common problems.
Here are the partial malfunctions of the thermal sweat and parts, the replacement or repair of which with your own hands in this case should be carried out first of all:
- The control panel is completely off, the device itself does not start and does not work.
In the case presented, the cause of the breakdown may be:
- a temperature regulator located, depending on the model, either on the bottom or on the side of the device;
- fuse;
- broken wires and connections.
- Only the temperature maintenance mode works, while the main boiling of water does not work.
You can fix the breakdown by checking:
- bottom temperature switch;
- The main heating element designed to heat water to 100 degrees.
- The opposite situation - boiling to “one hundred” works, and heating does not work.
There is only one advice - to check all the elements of the electric circuit, paying particular attention to the board module.
- Pressing the water supply button does not give a result.
The problem is the pump - you need to disassemble the thermal sweat following the instructions below and find out the true cause.
Dismantling the thermal sweat - step by step instructions
What to do if the device does not want to turn on, does not heat water, leaks or does not heat up? In this case, it is recommended to disassemble the unit by following this step-by-step instruction:
- disconnect the device from the electric current network;
- drain the water in the inner flask;
- turn the unit upside down;
- remove the plastic plug from the clamps with a flat screwdriver, knife or other improvised item;
Plastic plug
- unscrew all screws with a Phillips screwdriver;
- then remove the pallet (for the convenience of reassembly, it is recommended to photograph the disassembly process so as not to get confused);
- after removing the pallet, access to the water pump will be open, from which you need to remove the hoses that are held on plastic ties - they can simply be cut with scissors;
- then you need to remove the hoses from the nozzles from the printed circuit board;
- you can then proceed to unscrew the printed circuit board, which is held on small bolts;
- under the board there is a gasket - it must be removed in order to gain access to the heating coil;
Type of board with the overlay removed
- To gain access to the heater, unscrew the last 8 screws, then remove the protection;
- check the details that have been accessed with a multimeter in the manner specified later in the article for various types of malfunctions;
- for reliability, before reassembling, it is recommended to clean the heater from scale, as well as inspect the printed circuit board, if necessary, replace the capacitors with new ones;
- assemble in the same manner as disassembly.
Detailed analysis of repair parts
There is a certain list of internal parts of the thermal sweat, which it is recommended to inspect first.
Network wire
The 220 Volt mains lead may bend or make poor contact with the three-pin connector located inside the chassis.
First you need to directly check the wire itself in the “dialing” mode using a multimeter or by connecting the cable to some other device.
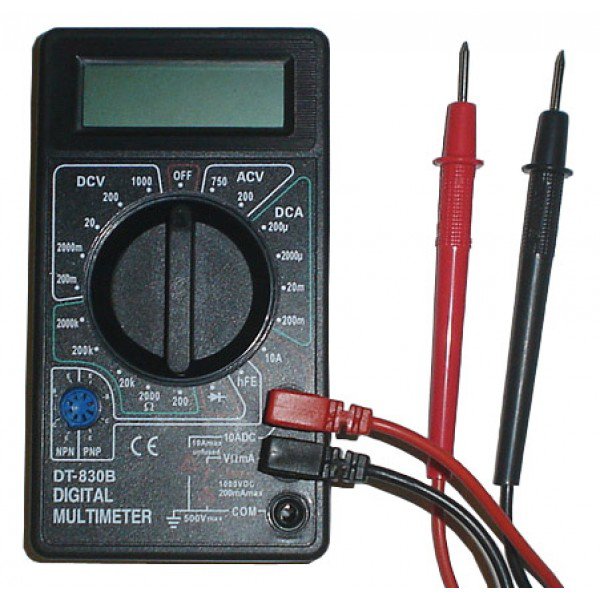
Multimeter
If the cable is functional, check the presence of voltage at the terminal after the transformer.
Microchips
Most models are equipped with two electronic modules:
- power board;
- control board.
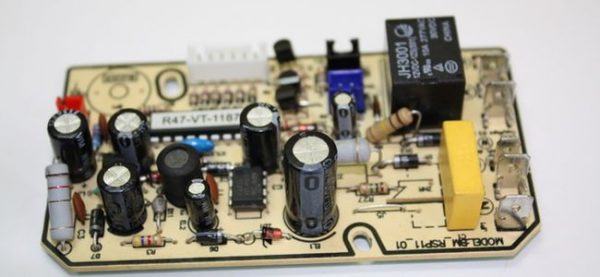
Management board
In fact, a power board is a power supply unit, from which an electric current of the required parameters is suitable for each element of the thermal stream.
To repair both boards, you must first examine them for:
- bloated capacitors;
- burnt out resistors;
- unsuitable fuses;
- torn contact tracks, etc.
All damaged elements must be replaced with new ones, having previously taken care of their purchase on the radio market. Damaged tracks can be repaired by tinning with a household soldering iron.
The most common problem here is a blown fuse. You can determine it by the torn thread inside the glass case.
If the fuse is OK, check the resistors and diodes with a tester.
Water pump repair
What should I do if the thermal sweat runs or, conversely, nothing happens when I press the drain button? In this case, you should get to the pump and start testing its performance.
This is done with a simple pairing of contacts.
To test the performance, you can also apply a standard voltage of 12 volts, taking it, for example, from powerful batteries or from a car battery.
Also, the corresponding voltage is supplied by power supplies installed in the system units of personal computers.
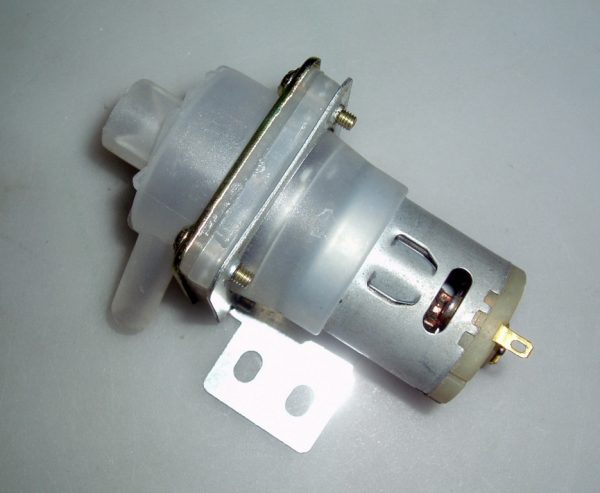
water pump
Repair of heating elements
If the heating or basic boiling does not work, the malfunction may be in the failed heating element. It is not recommended to make an independent repair of the heater - it is easier to buy a new one. The cost of heating spirals starts from 2000 rubles.
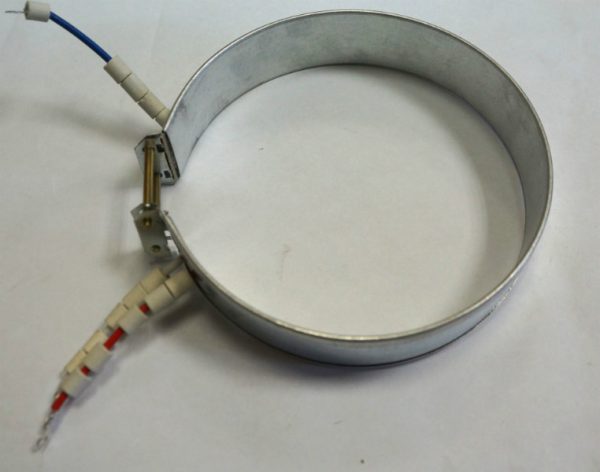
Disassembled ten
Analysis of common situations and methods for solving them
Here is a list of the most common problems - with instructions for solving them.
Thermopot carries out constant boiling
There is a situation when thermopot constantly boils water. The reverse is also possible - when the unit turns off at a time when the liquid is still far from the start of boiling.
The problem is malfunctioning thermal switches. They are located on the bottom of the device and on the side of the case.
The main problem of their inoperability is the application of a small amount of thermal paste by the manufacturer, which is why the thermal relay starts to work incorrectly due to poor contact.
The functional check of the relay is checked with a conventional multimeter - for this, it is connected to the contacts of the thermostat and put into ohmmeter mode. The tester should show a resistance of 0 ohms.
For additional testing, it is recommended to connect the thermal relay to the wires and lower it to boiling water. If the ohmmeter readings tend to infinity, the relay is serviceable, otherwise it needs to be replaced.
Also check of temperature regulators it is recommended to carry out in case the heatpot does not go into the heating mode. In the presented situation, you should also check the connecting wires - they can oxidize.
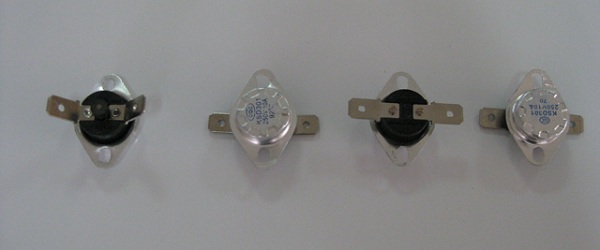
Thermal relay
Thermopot independently drains the liquid
Some are faced with the following problem - immediately after plugging into a power outlet, the thermopot drains water from the flask, starts to buzz, and a characteristic burning smell appears. How to fix such a flaw?
The problem here is the water pump. First, you need to disassemble the thermal sweat (see instructions above) and get to the location of the pump. Next, proceed with disassembling the pump.
After unscrewing the two bolts on the pump itself, you can access the impeller and magnet. In order not to buy a new pump, you can fix the old one - for this you need to disconnect the blades from the magnet and clean them of scale with a rag or soft cloth. You should also examine the magnet itself - the smallest metal particles that impede normal operation often accumulate on it.
If these steps have been performed, but the unit is still leaking, you should buy a new pump.