Large debris in the workshop can always be swept away and taken to a landfill in bags. But what to do with dust, metal or wood shavings, as well as numerous other microscopic production wastes? Purchase construction vacuum cleaner can hit the wallet well. A regular vacuum cleaner will not cope with such a job. But if you make a cyclone for a vacuum cleaner with your own hands or even your own construction vacuum cleaner, you can save yourself from a number of problems!
Why do I need a cyclone filter?
Building, metal or wood dust seem completely harmless. But this is only at first glance. Working in a room with a lot of dust can harm the respiratory system and cause serious illness. And the tools will deteriorate from the endless stream of debris. There may be several reasons:
- Dust enters the tool and the grease inside it. As a result, it overheats and fails.
- If the device has moving parts, then the dust may well impede their work, and also lead to damage in the future.
- Dust can clog special ventilation openings that are designed to cool the tool. As a result, it again overheats and breaks down.
A cyclone filter will ensure the collection of any debris in the workplace without harm to the vacuum cleaner.
Principle of operation
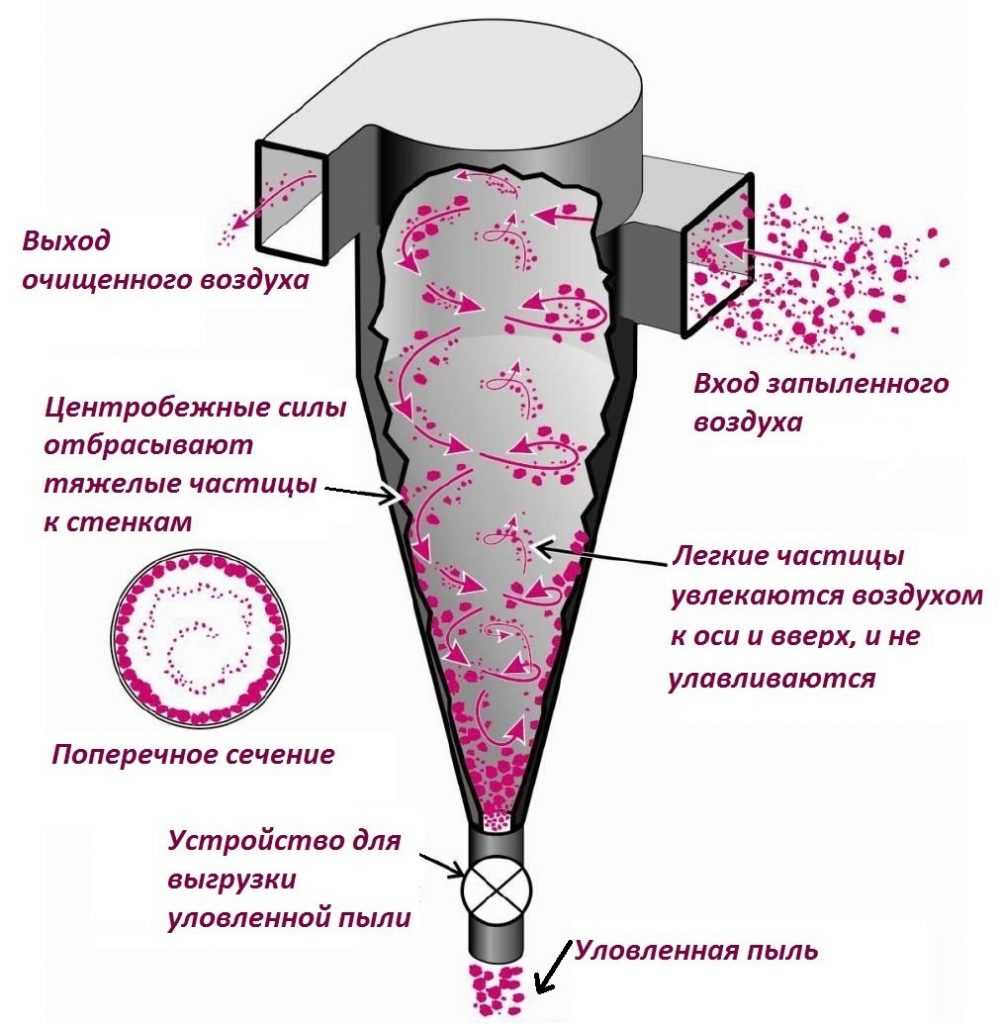
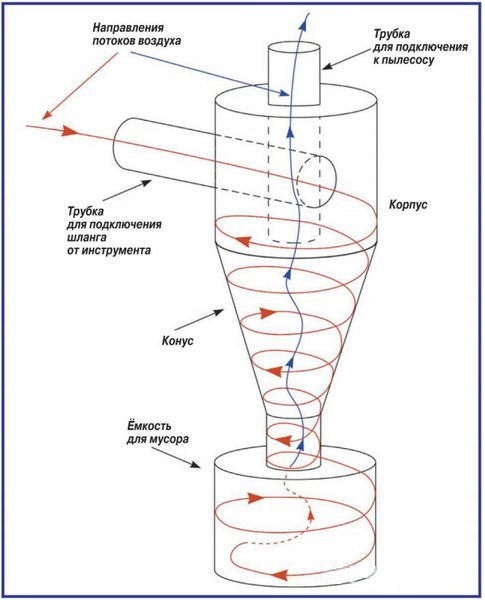
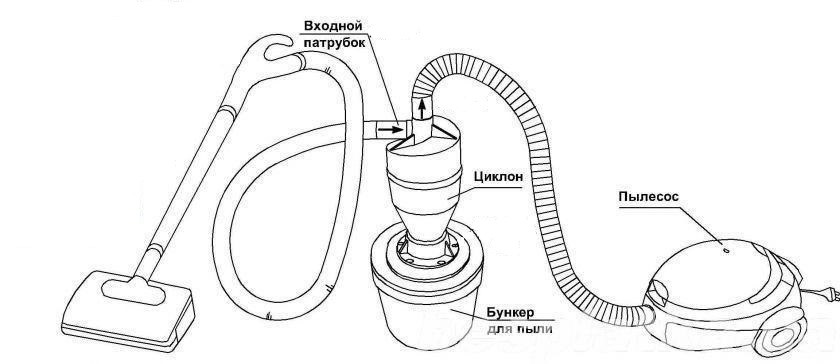
Using an aerodynamic air stream, the filter will connect dust particles among themselves. In turn, a centrifugal force begins to act, pressing them against the walls of the tank. And then gravity makes the trash sink to the bottom.
There are many circuits showing the operation of cyclone filters. One of them can be viewed at below.
Cyclone filter device
You can make one, or a similar filter yourself. There are a huge number of options for execution, but one thing unites them - the principle of work. Any design will consist of:
- An ordinary vacuum cleaner (preferably powerful);
- Cyclone filter;
- Garbage collection tanks.
Vacuum cleaner power is an important point in the whole design. In normal condition, it is designed to clean the house, the absorption of small debris and dust. In this case, a cyclone filter appears, so the length of the duct will be increased almost three times, respectively, and the load on the device will be more. The design is quite massive, unlike a conventional vacuum cleaner, so this trick is necessary so that the length of the hose is enough for a comfortable cleaning.
DIY construction vacuum cleaner: what you need
As mentioned above, you can use a conventional household vacuum cleaner. But many masters are not attracted to this option, so a homemade unit becomes the best solution.
In order to make such a device, need an old household vacuum cleaner, even if it survived with the time of the distant Soviet past. This is the advantage that homemade vacuum cleaners can be made from unnecessary old units.
So, from the vacuum cleaner we extract such elements as:
- Motor;
- A cord connecting the device to the network;
- Power adjustment device;
- Suction corrugation.
For the case, prepare:
- A pipe made of plastic with a diameter of 5 cm;
- Capacity with a lid;
- A plywood sheet about 0.5 cm thick;
- 14 nuts and bolts M6;
- Galvanized sheet metal;
- Car filter (from a minibus);
- Switch - 220 V;
- Sealant;
- Sandpaper;
- Rods for glue gun;
- Hose-corrugation (it is possible from a washing machine);
- Threaded stud with nuts and washers;
- Electrical corrugation PND32.
It’s worth immediately preparing the tools:
- Drill;
- Glue gun;
- Gun for sealant;
- Keys are metalwork;
- Screwdrivers;
- Knife;
- Jigsaw;
- Nippers
Manufacture
At about 10 centimeters from the top of the tank, make a hole into which we will connect the pipe. The hole should be oval even in shape. The pipe is placed in it slightly at an angle in the downward direction, fitting snugly against the wall. With a glue gun, you need to fix the result, as in image 2.
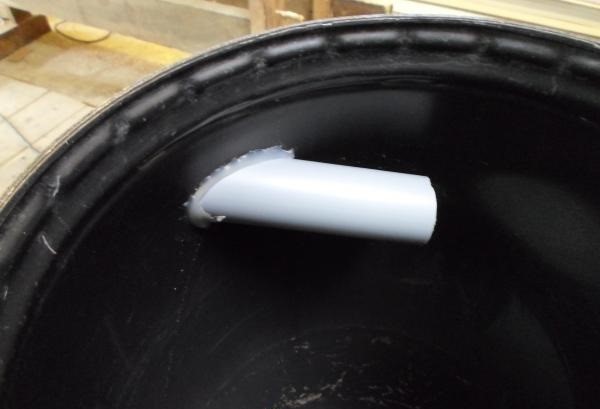
A pipe inserted into a pre-made hole in a barrel
We fix the adapter from the inside to connect the suction hose.
We cut out two circles in size about half smaller than the cover, drill holes for the bolts. Parts are attached on both sides. After other circles are drilled, and with an emery cloth, their surface is cleaned of burrs. We cover the perimeter of the product with sealant, after that, they are installed and finally fixed. A pin hole is made in the center. A little to the left will be a larger hole for air intake.
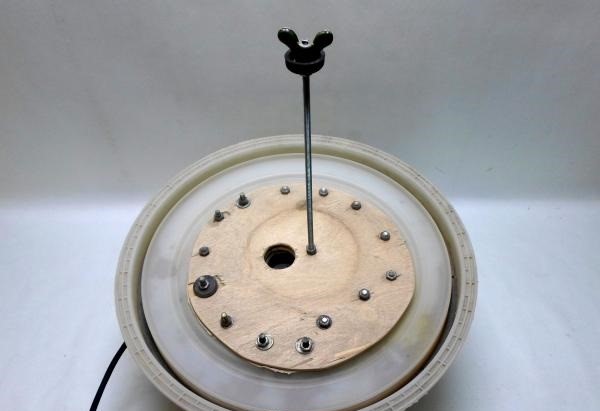
Location of studs and air vents
We need an air filter without a mesh (it will clog up with garbage, which is extremely disadvantageous) in which it is placed. It must be removed with pliers. One side of the cylinder should be closed with a plywood plug. The filter is attached to the stud with a nut.
By the way, the filter will help not only to get rid of dust, but also to prevent the inhalation of dangerous small particles, such as toner. If you use a conventional vacuum cleaner in this case, the bags are easily clogged with toner dust. In this case, all particles will settle in the collection tank.
Vacuum cleaner motor, in order to make it more convenient to fasten, you can cut it with plastic parts. To fix it on the lid, you will need a clamp that can be made from a strip of tin.
The switch and controller are located side by side. After that, all parts are connected with each other by wires, and a wire with a plug is connected.
Make sure that everything is connected correctly and that there are no bare wires, and only then check the operability of the device.
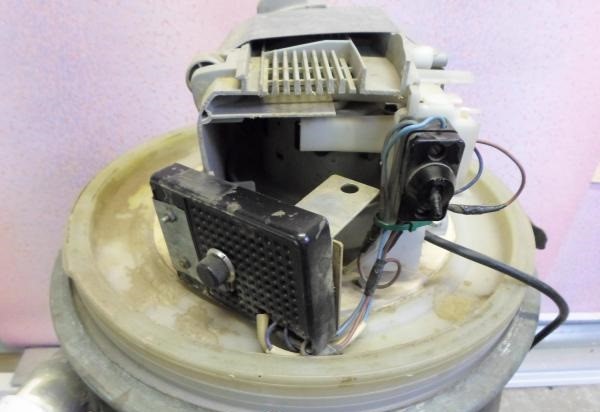
Location of motor, circuit breaker and power regulator
The length of the suction hose is usually not enough, so it is increased using a corrugated pipe.
Standard nozzles from a vacuum cleaner will help to clean up any workshop. They can also be used to connect to equipment, for direct garbage collection, with the help of ingenious adapters.
So, the homemade cyclone type construction vacuum cleaner is ready!
What to do if there is no way to make a vacuum cleaner with your own hands?
Of course, not everyone wants to make a vacuum cleaner from scratch, and there may not be any necessary parts. In this case, an ordinary household vacuum cleaner is best, better with high power. Next, you just need to make a cyclone filter for it, which does not require large expenses. Most often it is made from a road cone or bucket. Consider both options.
A drawing of a homemade cyclone can be seen below.
Cyclone drawing
Road cone cyclone
A simple and quick way to build a cyclone on a vacuum cleaner directly with your own hands is to make it out of a traffic cone.
What is necessary for work?
Once the manufacture of the cyclone will be done with your own hands, you need to prepare the necessary tools and supplies. So we are preparing:
- Road cone;
- Plastic pipes (approx. 40 mm)
- 45 degree angle;
- Plywood;
- Pieces of chipboard;
- Glue gun and rods;
- Capacity with a lid, it is possible from under the paint.
Let's start manufacturing
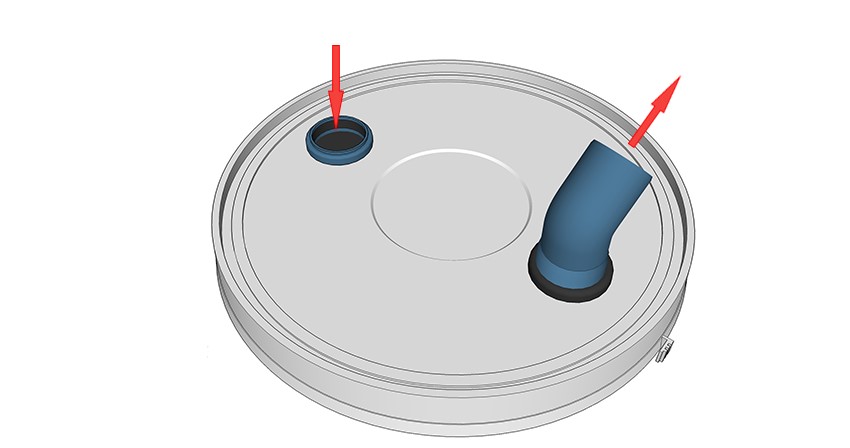
First we take plywood to make a cover cone out of it. We cut out a circle of the desired diameter, and in it we cut two holes. One will be in the middle, the second parallel to the edge, as in Figure 6.
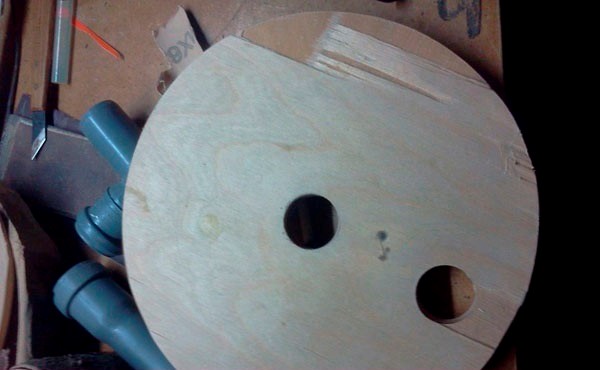
Plywood circle with air inlet and outlet openings
Next, you need to insert the tube with the extension up to the center of the circle as shown in Figure 7. The joint between the product and the tube is glued.
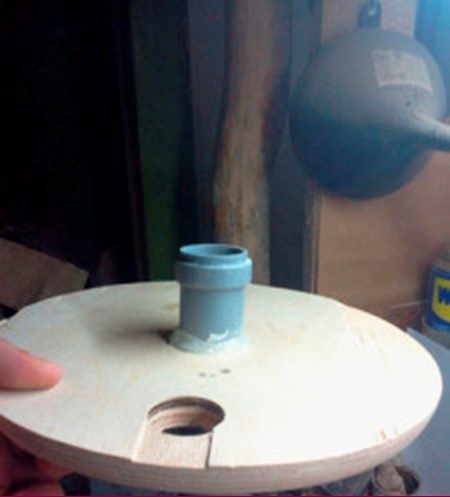
A pipe inserted into one of the holes
It is also necessary to insert a pipe into the second hole, but an angle of 45 degrees is put on top of it. It is moving along it that the air will spin in a whirlwind. The angle is located inside the cone.
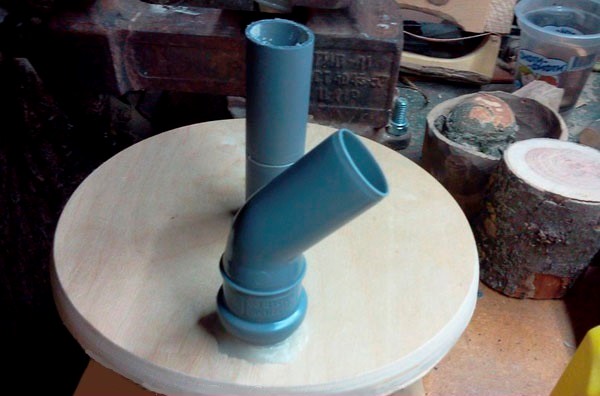
Corner location for proper air circulation in the cyclone
After the pipe is glued, as in the case of the first. The lid is ready. Then it is glued into the cone.
The tip of the cone must be cut off. After, it is inserted in the center of the bucket lid into a pre-prepared hole. The mounting location is glued. On the inside, the lid must be strengthened with pieces of chipboard. After they are pulled together by screws.
The result is a product as in figure 9.
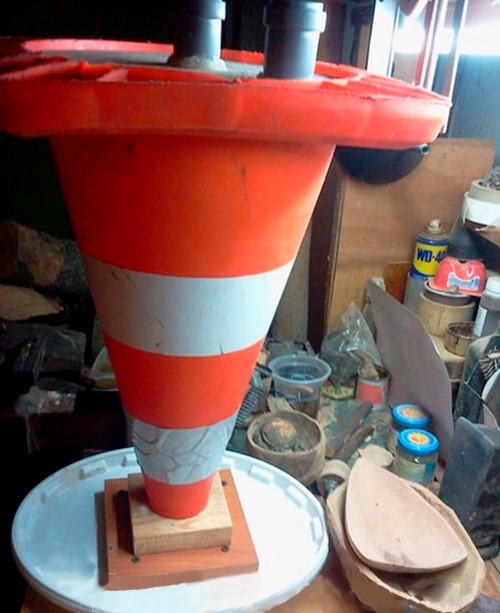
Ready product
Bucket cyclone filter
Another simple material for the manufacture of a cyclone filter will be an ordinary bucket, even from under the paint. The volume must be calculated based on the power of the vacuum cleaner - this is approximately 1 liter of capacity for every 80-100W.
The bucket should have a hermetically sealed lid, and the shape of the container itself must be round!
For manufacturing you will need:
- A bucket with a lid (it is possible from under building mixtures);
- Compass;
- 2 knees 90 and 45 degrees;
- Plastic pipe;
- Silicone;
- Rubber or o-rings;
- Stationery knife;
- Glue gun.
Manufacture
We make holes in the lid. You can use the factory compass, or you can make it yourself. Screw two self-tapping screws into the rail of wood at a distance of exactly 2.7 centimeters from each other.
The center of each hole is outlined 4 cm from the edge. Next, circles are cut under the pipes at the marked places.
Next, we’ll deal with the sewer knees.
We insert the knee tightly into the bell, after applying silicone to its side. On the inside of the product, a seal is pulled onto the bell. If necessary, squeeze the clamp. It will turn out as in figure 10.
We insert the pipes into the lid of the bucket, turning the angle correctly
On the outside, the inlet is almost flush with the cap. On the reverse side, the knee is directed by the turning part to the center of the bucket. But for the desired effect, it is equipped with a rotation of 45 degrees, which is directed obliquely downwards as in Figure 11.
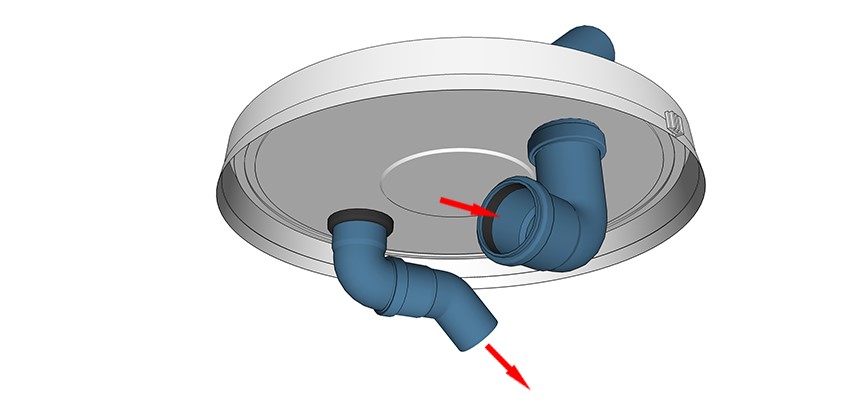
Back view
The second pipe, which will draw air, is located in the opposite direction. A knee is inserted into it so that air is drawn from the wall of the bucket. It is necessary in each case to use o-rings, they will allow you to securely fasten the pipes, and will not allow them to turn.
That's all. Then it remains only to cover the bucket with a lid and connect the vacuum cleaner to a makeshift cyclone, which is perfect for cleaning a large amount of garbage.
We conclude that you can make a cyclone for a vacuum cleaner with your own hands quickly and easily, using available tools. At the output, you should get something like this device as in the figure below.
Cyclone filter connected to a household vacuum cleaner
Difficulties you may encounter while working
It’s not difficult to create a cyclone filter, or even a home-made vacuum cleaner, if we have the necessary materials.
In some cases, it is recommended to take metal containers for garbage collection, as they are considered stronger. In the presence of a vacuum cleaner with great power, a plastic bucket can “collapse”, so to speak. It is drawn inward due to the strong flow of intake air. This happens extremely rarely, but it is better to immediately provide for such an option.It can be aligned, but damage to the product will be on the face. So you always need to consider the quality of the plastic and the power of the device. In the case of a traffic cone, such a problem does not occur.