The home comfort of an apartment of a modern resident is impossible to imagine without a set of household appliances. Using various devices, dry and wet cleaning, cooking and washing dishes, washing and ironing are carried out.
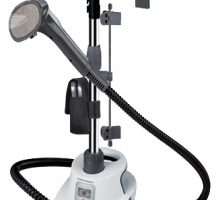
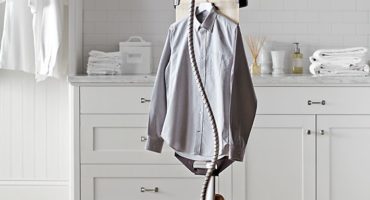
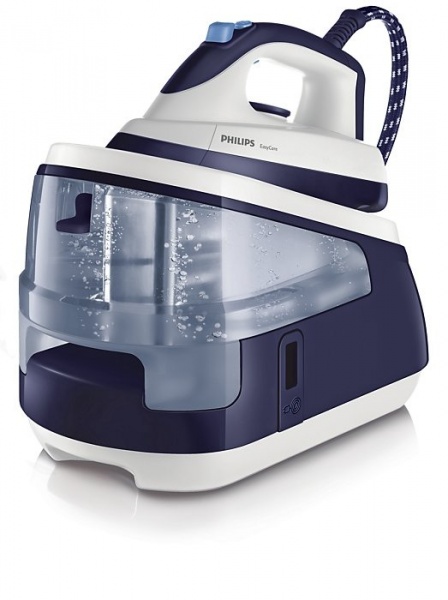
Increasingly, in apartments you can find powerful devices for smoothing laundry with hot steam - steam irons. They are very convenient and minimize the time required for ironing any type of laundry.
Long-term operation and untimely care cause various malfunctions. Ultimately, the device fails.
To restore the operation of the device requires repair. Therefore, you need to know how to disassemble yourselfiron with steam generator system at home.
Causes of malfunctions
In some cases, it becomes necessary to disassemble the device due to a malfunction.
The main causes of malfunctions are:
- Burnout of a heating element (TENA);
- Failure of the steam pressure adjustment switch;
- Thermal fuse blowout;
- Jamming of the boiler switch button in the lower position;
- Failure of the electromagnetic valve;
- Broken power cable;
- Separation of cores in a power cable;
- Dense sediment of limestone deposits (scale);
- Failure of the automatic steam supply mechanism;
- Violation of the thermostatic sensor;
- Failure of the water level sensor in the boiler;
- Violation of the mechanism of thermal control;
- Water leakage under the sole body;
- Failure of the heating elements of the sole;
The elimination of the identified deficiencies requires partial or complete disassembly of the steam generator. Also find out why the steam generator is leaking can be found here.
Tool and equipment
To disassemble the iron with a steam generator, the following equipment is required:
- Multimeter.
- Oscilloscope.
- Electric soldering iron.
- Phillips screwdriver.
- The screwdriver is flat.
- Tool for squeezing panels.
- Device for pressing hidden latches.
- LED flashlight.
- Magnifying glass.
- Alcohol solution.
- Rag (rags).
Tool for pressing panels
To disassemble the iron with a steam generator, you need to remove several panels from the device. For this, manufacturers provide special gaps (seams) along the body of the steam generator.
The fixation of individual elements is performed using metal or plastic latches.
Removing panels and latches at home is a pretty difficult task. Using an improvised tool such as a knife or screwdriver may cause marks on the machine. Scratches and chips on the case spoil the appearance of the steam generator.
In service centers, special tools are used to spin out the elements of the steam generator body. To disassemble the steam generator at home, such a tool is done with your own hands.
The devices for pressing panels and latches are made in the form of a thin wooden stick with a beveled lower end. To remove small parts, just one such push-up is enough. The dismantling of large elements and panels will require the use of two squeezing devices.
For your information. For making squeezers, flat wooden ice cream sticks or plastic coffee mixers are ideal.
Such devices are easy to manufacture and convenient to operate. The use of squeezers will make it possible to disassemble the steam generator without scratches and breakage of small parts.
Latch release tools
They are performed similarly to the panel presses. Used to remove hidden latches and control buttons.
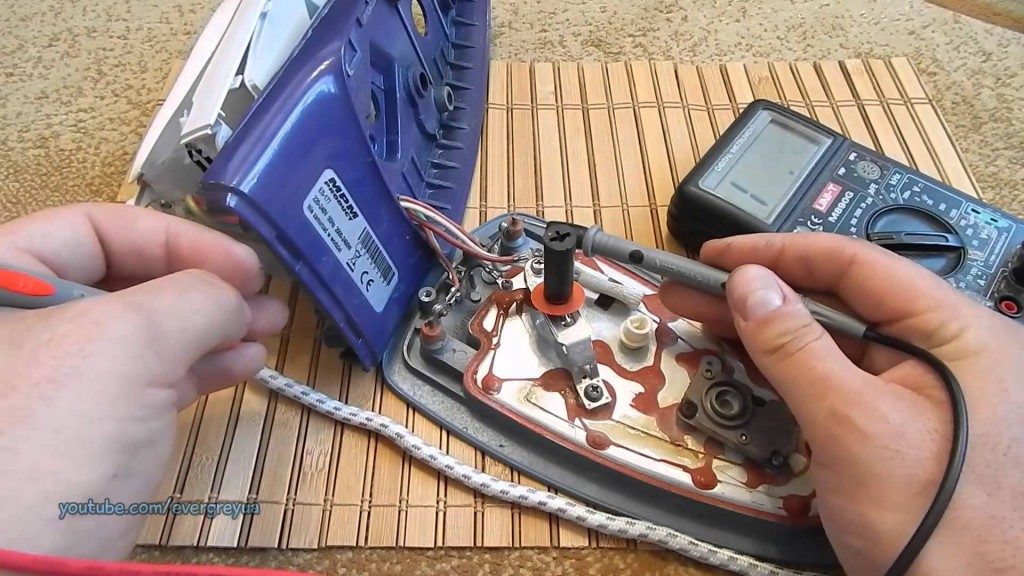
Multimeter
This device determines the overall integrity of the electrical circuit. The device is also necessary to determine the place of cable break.
Oscilloscope
Used for a detailed study of electrical voltage parameters. It will be required to determine the amplitude and value of the phase shift.
Electric soldering iron
Used to eliminate wire breaks in the cable and places of attachment to the contact plates.
LED flashlight
Required to access poorly lit and hidden elements. For convenience, use a flashlight, a special strap attached to the head.
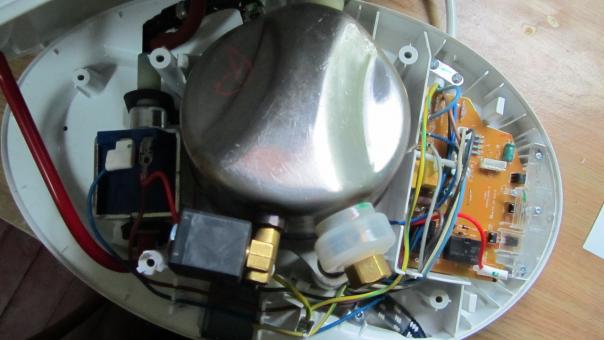
What does an iron with a steam generator consist of
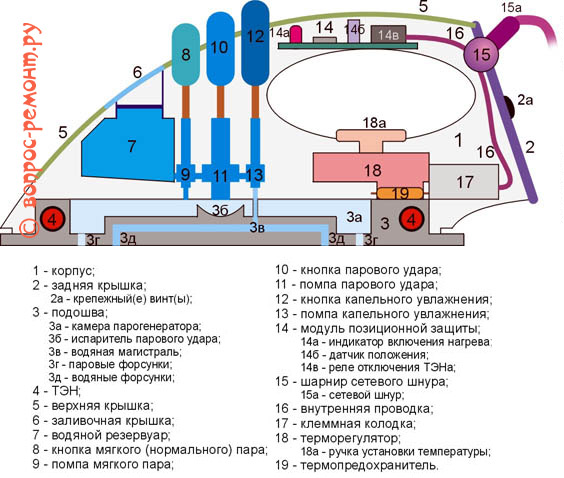
The main structural elements of the iron with a steam generator are:
- Back cover.
- Block.
- Top cover.
- Body.
- Sole.
Back cover
The back (end) cover is attached to the housing with one or more screws. Depending on the model of the steam generator, the design of the back cover has two options:
- the back cover is attached to the block;
- the back cover is not attached to the block.
In the first embodiment, the back cover has a direct design. Using horizontal spikes, the top cover is attached in the longitudinal grooves.
To disassemble the iron body with a steam generator, the back cover and shoe are pushed back. In this case, the upper cover must be pushed with your fingers.
In the second case, the top cover is pulled up. Swivel locks unfold and release the mounting spikes from the locked position.
Block
The block is intended for fixing the current-carrying cable in the case of the steam generator. It has two main designs:
- monolithic;
- collapsible.
The monolithic block is removed by removing the two screws of the block itself and the two screws of the clamp securing the power cord.
To remove the collapsible pad, squeeze the latches that hold the pad in a fixed position.
Top cover
Fastening of the top cover is provided without fixing. To remove it with your own hands, use squeezing devices. The cover is removed from the rear or front end.
Housing
Iron body with steam The station is attached with several screws. These screws are quite often recessed deep into the body of the device.
In addition, manufacturers use screws of various shapes and sizes. In this case, you will need a set of screwdrivers, varying both in shape and length.
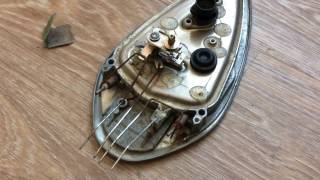
Sole
The sole design provides for the location of conductive and heating elements.
To check the operability of the electrical circuit, control devices (oscilloscope, multimeter) are used.
Iron disassembly procedure with a steam generator
To disassemble the iron with a steam generator, you must:
1. Unscrew the screws that secure the back cover to the iron body. The shape and size of the screws for different models may be different. Therefore, to disassemble the device, universal screwdrivers or nozzles for them are required.
2. To protect devices from unauthorized opening, they are used to fasten the back cover with screws with a unique shape. Such irons are disassembled and repaired only in certified centers.
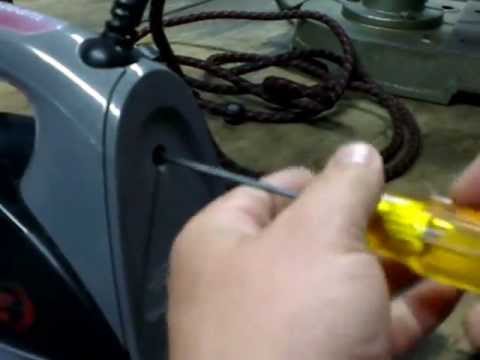
3. Remove the back cover by prying it with a flat screwdriver behind the gap on the housing.
4. Loosen the screws or loosen the clamps that hold the shoe in place.
5. Remove the top panel of the steam station housing.
To do this, first remove the plastic caps for the supply of water and steam. One cap is recessed inside the iron. The second cap is removed, grabbing the fingers with your hands. After removing one cap, fingers remove the second cap.
Also, following the link, you can find out why the steam generator is not producing steam.
For your information. In irons with steam function only without a sprayer, there is no second cap.
Remove the screws under the caps of the steam and sprayer. In some models, an additional screw is located in the bow, in the area where the sprayer is mounted.
5. Next, unscrew all the screws securing the upper block to the iron body.
6. After removing all the bolts, remove the upper part of the body of the steam station.
To do this, use a thin knife or a durable blade, which pry the upper panel in the existing gap.
In other designs of irons with a steam generator, it is enough to make a twisting movement of the hand to remove the top cover.
7. After removing the top panel, remove the water supply tube from the steam heater tank to the sprayer. To do this, raise the sleeve holding the tube in a fixed position. Then the coupling must be pulled to the side and one end of the water supply pipe is released.
8. Then unscrew the three screws on the rear and front ends of the iron body. These screws become visible after removing the top cover.
9. Next, remove the upper part of the iron body. To do this, the latches that fasten the upper part of the body to the lower are unbent.
10. After removing the upper part of the body, dismantle the steam generator and disassemble iron sole. In this case, the pumps for supplying water to the nozzle and sprayer are also removed.
11. Then remove the temperature controller for heating the sole. To do this, use a flat-blade screwdriver to pry the regulator cover from the bottom and carefully remove it. Then unscrew the screw located under the removed cover of the temperature controller.
For your information. In some manufacturers' irons, there is no screw under the limb of the heating temperature controller.
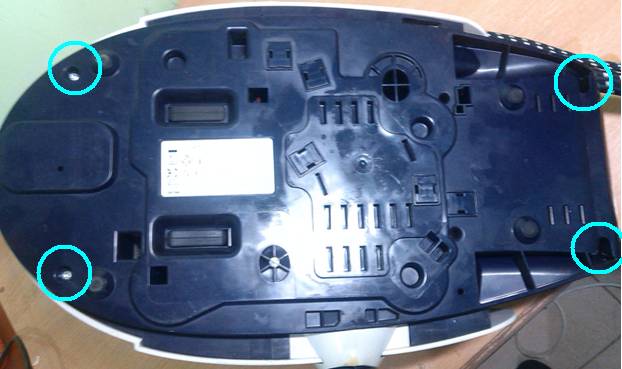
12. After removing the regulator cap, unscrew the screws securing the reservoir to the bottom of the iron. On many models of steam generators there are four such screws, two screws on each side of the device case.
13. Then the tank is carefully separated from the sole of the iron in such a way as not to damage the elements of the electrical circuit.
14. After removing the tank, unscrew several screws that hold the sole protection.
After removing the protective casing, free access to the elements of the electrical circuit, attached directly to the inner sole of the iron.
Using these instructions and recommendations allows you to independently disassemble the iron with a steam generator at home.
Read also: clean the iron from scale at home.